I traded some models recently for yet more AT stuff from a mate, because I just can’t resist these awesome titans. My idea behind these was to paint up some already built models quickly to enable a couple of forces to get on the table.
Did you see there mistake I made there? That’s right I said “paint” and “quickly”. If you’ve looked at more than maybe one article on this blog you’ll know that wouldn’t end well. So where did that simaple aim go wrong? What am I up to with Tritonis Titans?
The first snag is that the titans I had acquired were not in the best examples of assembled titans. I had two Reavers, both of whom had awkward or absurd poses and a Warlord that could do with a little TLC. This was not my mate’s fault, he’d got them built second hand too. I think he’d sorted out the Warlord, and made the best of a bad job with the Reavers, but I’ve taken them apart as much as possible to try and re-assemble in more reasonable poses. While doing this i came up with the idea of making custom armour plates for the titans.
A Learning Curve
I am an engineer by trade, and interrogate 3D models fairly regularly at work. What I don’t do is generate the 3D models, I’m not a designer. I have been dabbling with with modifying other people’s digital models over the last year, Grim Dark Terrain, Aphyrion Miniatures, RNEstudio Mythbowl all spring to mind. This time I wanted to create my own model parts to fit to the titans. This post is a quick summary of that first journey. My first goal was to create the Warlord’s tilting shields.
To do this I choose to use Tinkercad a free online modelling tool. Its very simple to create shapes and then add or subtract them from one another, but that’s only a small part of what the tool can do. I believe I have barely scratched the surface of its utility and I certainly haven’t invested a lot of time learning how to use it. I’ve just dabbled with it really over the last year or three* of having a 3D printer. I can’t do a blow by blow account of how I generated the tilting shields, nor is that the intent of this article, its more to give an over view of my challenge. Here is my first attempt at creating a Warlord’s tilting shield in Tinkercad.
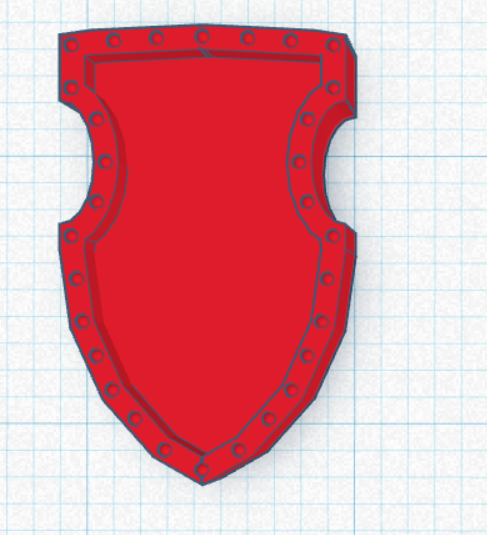
This first attempt was OK, but I didn’t actually intend to create a faceted curved lower edge to the shield. That’s a by-product of how I generated the initial shape that I created the curve from. To correct that ‘error’ in Tinkercad once I had got to this stage meant basically starting from scratch. Which brings me neatly to the next tool I used; a piece of parametric design software called FreeCAD.
Parametric Tilting Shield
I’m not going to pretend I know the difference between parametric and direct design modelling, yet alone explain it. So here is my brief interpretation of what they are – which may be complete drivel.
“Both design programs work by creating 2D sketches and developing those sketched geometries into 3D volumes. With direct modelling you draw the sketch, and build the volumes, but none of the elements are necessarily linked. Which means it can be hard work going back to correct an error. With parametric modelling you draw your sketches and build the volumes, but this time the elements are linked. A mathematical model is generated that connects the elements – it knows that line ‘A’ is connected to line ‘B’ and that they are normal to each other. So you can go back in a change a parameter for a given element, such as the length of line ‘A’, and assuming you’ve done a good job of building the 3D model everything should update.”
Dave – absolutely not a subject matter expert
Both philosophies have their pros and cons, as everything does. Not least of which was yet another software to learn. Yet after a little trial and error, and not forgetting Youtube (this was helpful) I managed to produce this.

So I exported the FreeCAD model as an STL and imported it back into Tinkercad.
“What?!?!? Why?!?” I hear you cry.
Firstly, I had spent a bit of time messing in Tinkercad creating the mounting point for the back of the shield, and making loose drafts of the shield details themselves, I didn’t really want to try and recreate parts I was happy with. The image below is what my shield rear mounting looked like, left all complete, and right in its individual geometries/volumes before combining together.

Secondly, I know that I can manipulate models in Tinkercad, and can import STL, OBJ, SVG file types. The first two are 3D image files, the last is a 2D image file. My intension here was to generate the 2D .svg file of the details on the shields and import into Tinkercad to help generate the final 3D model. FreeCAD can import SVG files too, but that’s another learning curve still to climb. Like I said earlier this is not a ‘how to’ article, I guess its more of a ‘how not to’ lol.
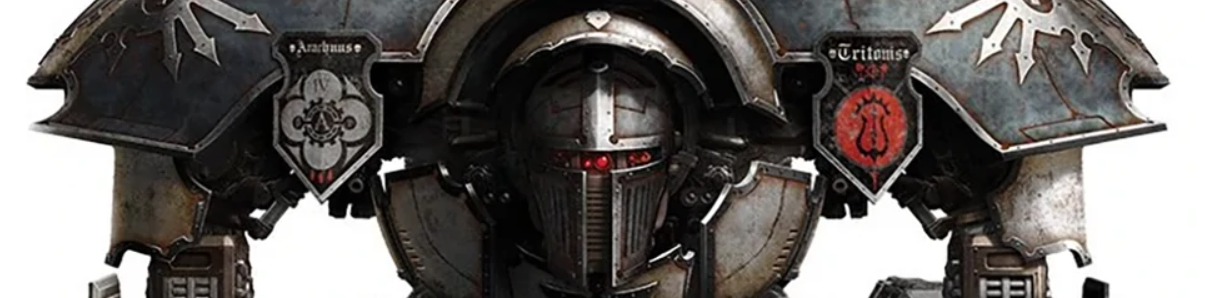
SVG files bring me neatly to Inkscape, software I have used in the past to create SVG files that CogOTwo have used to laser cut stuff for me. This allowed me to quickly generate the text in a font I liked. Tinkercad can do text, but only in a limited number of fonts (5), or so far as I know anyway. Anyway below are a selection of the SVG files created in Inkscape and imported into Tinkercad. I used a gothic looking font to create the text, and Inkscape also allowed me to trace the trident symbol from the Warlord image above.
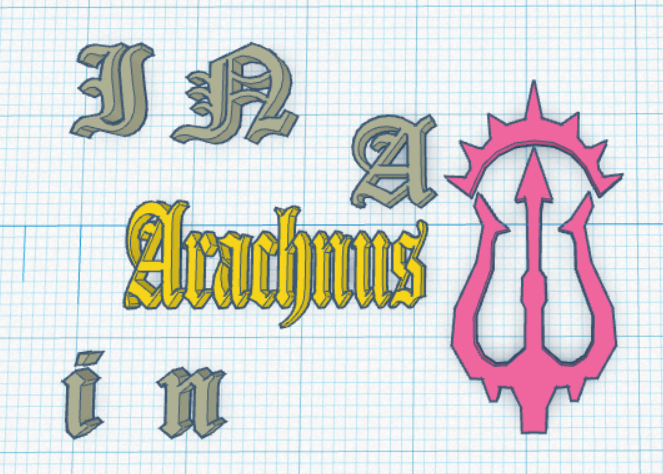
This process is a bit like Lego in way, I have created the building blocks of the shields, and brought them all together in Tinkercad to assemble. The Arachnus tilting plate has gone through the most evolution, not all of which I have saved. Tritonis are named after the three celestial bodies that make up Arachnus, the forgeworld Arachnus and its two moons Iktomia and Nizkara. I have tried to symbolise this on my tilting plate by having a central circle with the letter ‘A’ surrounded by a cog represent the forgeworld Arachnus, and two orbiting smaller circles with the letters ‘I’ and ‘N’ representing the two moons. You can see some of the evolution of the Arachnus plate in the image below.
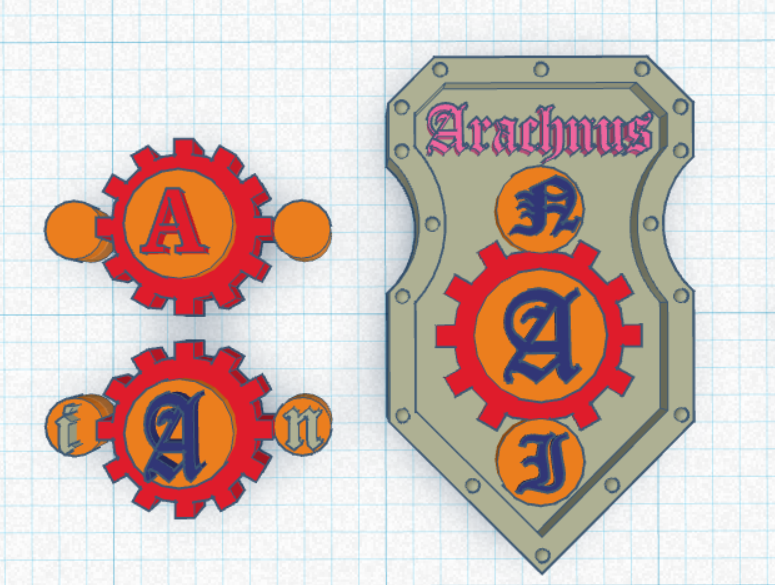
What you can’t see here is the various tweaking of the lettering I have done within Inkscape to try and make the ornate gothic script printable and readable. Inkscape allows you to change the path of the vectors making up the image (SVG – scalable vector graphics) so I can modify the font to hopefully print once scaled down to fit the shield.
3D Printing – Rapid Prototyping
During this design process I have printed out the various shields, allowing me to see where tweaks are needed to make them printable and paintable. To print them off I used my Elegoo Mars 2Pro with a layer height of 0.03 mm. I actually have 7 shields printed, so far, I even painted two up quickly to see how the embossed text and debossed letters would take paint.
The image below is from Tinkercad showing the shields before printing, there is actually a missing pair which had slight changes to the lettering.
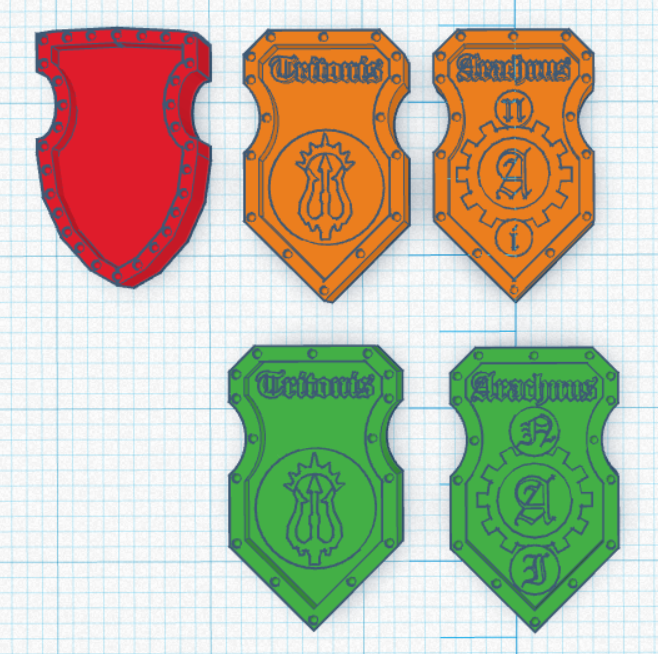
And here are the printed shields laid out in the same order as above. The painted shields are the green ones above.

That’s as far as I have got for now. I feel that the trident and crown need a little distance between them on the Tritonis shield. Just to allow more separation when painted to better define the two parts. The Arachnus shield could do with the ‘N’ adjusting in the upper moon body. It is mathematically central but does not look it! It could also do with being a bit more paintable.
If I feel in the mood, I may do a number of designs as Tritonis do have a large number of Warlord titans, can have them all with the same tilting shields! Once their done I will probably share them online somewhere.
Update – 22nd October 2024; these are now available on Cults3D in their version 1.0 state, link: https://cults3d.com/en/3d-model/game/tritonis-dark-tide-tilting-shields
Thanks for reading – here is the usual affiliated links paragraph. If you’d like to support the blog, please consider making your own hobby purchases through one of the affiliate links. It doesn’t cost you anything, I just get a little commission which helps pay the WordPress fees etc. You can click the links below or the webstore banners on the site.
Element Games (get double element crystals** using code DAV615)
*I checked the age of my earliest model, its three years old, from when I got my Ender3 and its an adapter for a pump for an airbed. It printed fine and worked well. Three years! I really have no excuse for not knowing more about how to use Tinkercad! I also found a more Titanicus related model from ~2 years ago, which was to be an electronic titan terminal – I need to finish that project off.
**Seriously, this is actually pretty cool. I’ve only just started doing this regularly and I have no idea why. I tend to use the crystals to offset the postage costs if I don’t hit the free post threshold, but when you earn double you can start to use them for products too.

hi, did you eventually share your designs anywhere?
I’ll try and sort something out this weekend.
Also keen to see these!
Hey, Just checking iff you shared it already?
I would also love to use these
Now on Cults3D: https://cults3d.com/en/3d-model/game/tritonis-dark-tide-tilting-shields
awesome!