I traded some models recently for yet more AT stuff from a mate, because I just can’t resist these awesome titans. My idea behind these was to paint up some already built models quickly to enable a couple of forces to get on the table.
Did you see there mistake I made there? That’s right I said “paint” and “quickly”. If you’ve looked at more than maybe one article on this blog you’ll know that wouldn’t end well. So where did that simaple aim go wrong? What am I up to with Tritonis Titans?
The first snag is that the titans I had acquired were not in the best examples of assembled titans. I had two Reavers, both of whom had awkward or absurd poses and a Warlord that could do with a little TLC. This was not my mate’s fault, he’d got them built second hand too. I think he’d sorted out the Warlord, and made the best of a bad job with the Reavers, but I’ve taken them apart as much as possible to try and re-assemble in more reasonable poses. While doing this i came up with the idea of making custom armour plates for the titans.
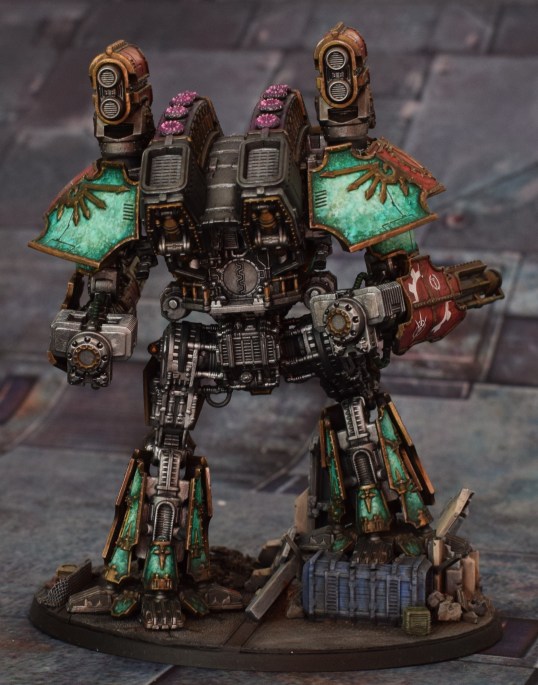
Well I finished my Warlord, only 22 months after starting putting it together – geez I’m slow.
Warlord Sagitta Verum, the Arrow of Truth
Princeps Cayttei Lueze
During the opening months of the Horus Heresy the Warlord Titan Sagitta Verum saw service on Aedlingon 5, during the Sibarton Offensive where she sustained heavy damage to her left leg and motivators. After refit the next major action was on Clarendon 3 against traitorous forces of Legio Xestobiax under the command of Princeps Tonbo. The ensuing titan conflict wrought heavy loses on both sides. The loss of a number of titans from Lueze’s maniple has ensured if their paths cross again that vengeance shall be served against Princeps Tonbo.
Working from home during the Covid lockdown is proving challenging on the hobby time. Usually I find myself working late into the night to cover the hours I’m not working when I’m looking after my lad. Fortunately this last week I’ve been off work – stay at home holidaying. So I’ve made some progress on my Solaria Warlord titan.
The UK has been in lock down for 3 weeks now, and on top of that I’ve also had a week of isolation so I’ve had 4 weeks of glorious hobby filled painting, right!?!?! Ahh well, as idyllic as it sounds spending all that time at home with family, reality is that I’ve had just as little time to myself as if none of this had happened. Yes, I can hear your snorts of laughter and groans of disbelief. I hold my hands up, I’m as staggered as you all at my apparent lack of progress.
The good news is, I have painted my garden fence panels…well until I ran out of fence paint (the wife says they need another coat).
“So what have I been doing worth writing about then?” I hear you ask…
I started building my Ordo Sinister Psi Titan, from my last post. Started almost as soon as I’d finished that last post; there’s just been a delay getting this post written. The kit goes together really well, most of it being the plastic warlord obviously. The Forgeworld resin was nicely cast with minimal clean up work required for my kit. I really like the instructions that come with the Forgeworld kit, in some ways I think they are better than the plastic Warlord instructions.
I’m a sucker for Adeptus Titanicus, I haven’t had a game in ages, and yet here I am buying the new toys – so much for ‘paint what you have before buying more’, a January resolution. Although I do have some things on ebay at the moment, so that counts right? 😉
The Ordo Sinister Warlord Psi Titan is available direct from Forgeworld, it consists of a Warlord Titan with Sunfury Plasma Annihiliator and Power Claw plastic kit (this one) and a resin upgrade kit. The resin upgrade kit consists of head, weapon arm, and carapace gubbins. The Titan also comes with its own terminal (made of thin card) and weapon cards (also thin card).
At first I was a little disappointed that the terminal and weapon cards were of thin card stock. However after a bit of thought, maybe this isn’t a bad thing. The terminal being made of thin card means i could easily stick some metallic sheet to the back (I think this is what I have bought in the past) and the magnetised tokens should still be able to stick to the terminal, without the chore of putting magnets in the thicker terminal’s holes – the biggest advantage being the lack of polarity issues! My weapon cards go in sleeves glued to the front of the terminals, so I guess them being ever so slightly thinner doesn’t matter at all.
I have to say I really like the instruction pamphlet. It is really clear and easy to understand.
Base
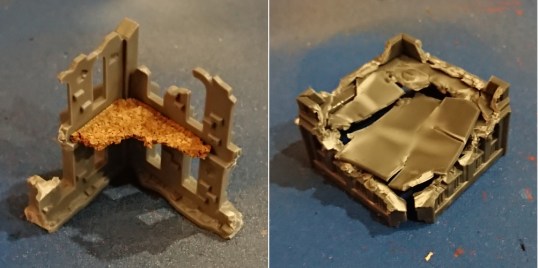
I pre-orderd the Titan and before it even arrived I started building the base. I want the Psi Titan to be stalking through a ruined city-scape. I got out one of the Titanicus Civitas Building sprues and my old Epic Armageddon buildings to see if i could create some ruins on my Titan’s base. I also got various other building materials, plasticard sheet/strip, cork, sandpaper, etc.
I created some different textures on the base by using sandpaer, plasticard, and cork sheet. You can create some interest on the base just by varying the textures, and the relative heights of the textured sheet.
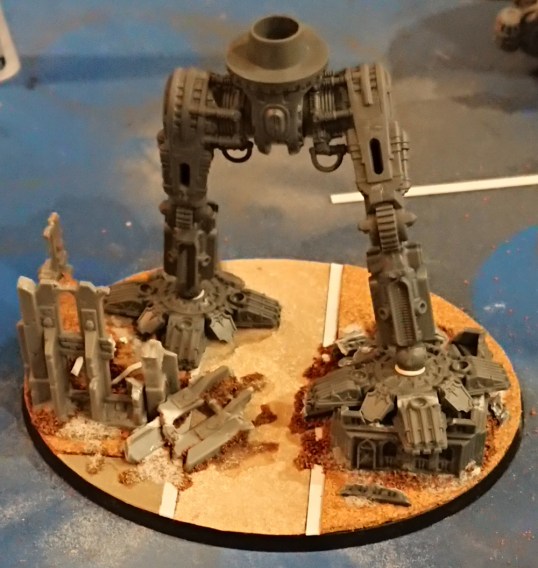
I also chopped up some buildings/ruins to create ruins that fit the base better. I wanted the Titan to be stepping on one building, so I used the single story squat building from the Civitas building sprue as the basis for the building to be crushed under foot. The Epic ruins were cut up to make the ruin fit the available space on the other side of the base. Now at this point I had not received the Psi Titan, however I did have a Warlord Titan still on sprue, so I started building that one to make sure there was room on the base to attach the feet.
As I had started using the Warlord that I already owned, I could make sure my buildings would fit around the Warlord’s feet. I could also try to ensure that the crushed building did actually look like it was being stepped on by the Titan. I even gently bent the foremost toe of the Titan’s foot slightly to be in contact with the building. I did this by scoring the underside of the toe joint till I was able to bend the toe at the joint – I did the bending very carefully!
The buildings were glued into place after dry fitting all the pieces. Placing both buildings and the Titan feet on the base to ensure everything fitted OK. The buildings then had scrap cork, plasticard, and pieces of the chopped up building glued around them like fallen masonry. I also used some basing sand and some bicarbonate of soda glued down to represent smaller debris scattered around.
This is the current base and the Warlord’s Titan legs positioned (with Blu-Tac) to demonstrate the hopeful end result.
Hopefully the next post will have a fully assembled Titan… soon!