
Following on from my previous post about building/cobbling together a version of Warhammer Quest. In this post I tackle building the board sections used to create the game’s dungeon.
The idea I had in my head was to create some board sections that would be fun to play on and hopefully be quite durable. These are some of the attributes I wanted my boards to achieve.
- Durability – be a bit more than just a piece of printed paper/thin card.
- Have some weight to them so they don’t move around too easily on the table top like printed paper and card would do.
- Interlock, so as the dungeon builds up an accidental nudge doesn’t create an earthquake of dungeon collapsing proportions.
- Be interesting to look at, I want there to be nice little details on the boards in a similar manner to the original artwork for the boards.
- Be playable, not much point in making these if they are awful to play on.
- Painted up to a good standard.
Well that’s only a small wish list, right?
I have to admit I didn’t really give much thought to alternative materials or methods and I just ploughed straight in to using what I thought would be best with no experimenting/research. Perfect recipe for disaster, don’t you think? Well lets see…
The Plan
My plan was pretty simple:
- Create a number of tiles of various textured surfaces based on the size of the squares of the original boards.
- Make a mould of the tiles using silicone.
- Cast the tiles out of resin.
- Mount the tiles on to MDF to form the board sections.
- Paint.
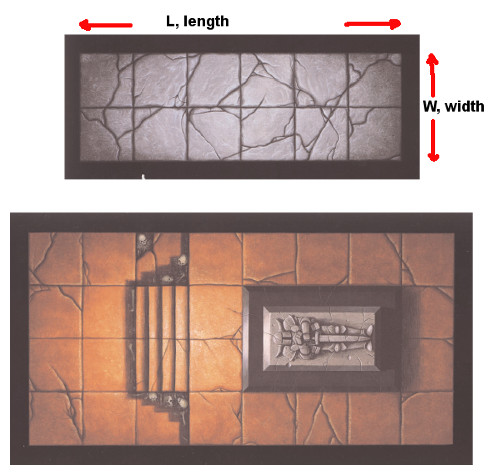
Before I could start work on the tiles I had to determine how big to make them. For the models I intend to use, and the bases that they would be mounted on, to fit the squares of the board the square would need to be pretty large. The original game had 30mm squares, I believe. I don’t have a source for this, its just what I feel they look like bases on images of models stood on the boards. All the original game’s models sat within the square quite happily – even the Minotaurs. There in lies the first problem with playability. If I used a modern sculpt for a Minotaur its very likely going to be filling a 50mm base (I’m fairly sure the old WFB Minotaurs were on 50mm square bases). Heck even a modern day Orc – sorry Orruk – is sat on a 32mm base. I wanted to balance the larger models’ bases against having room on a board section to play them. I ordered some 2mm thick MDF square bases off eBay in a number of sizes; 30mm, 35mm, & 40mm. I played around laying them out in a board section’s arrangement and standing models on them. In the end I settled for 40mm squares. I’m hoping the game’s ability to allow for regular changes in the direction of the dungeon route will still allow my board to sit on the kitchen table. Below is a table showing the overall sizes of two typical board sections depending on the size of square used.
| Square Size | Corridor Board Length | Corridor Board Width | Objective Room Length | Objective Room Width |
| 30mm | 180mm | 60mm | 240mm | 120mm |
| 35mm | 210mm | 70mm | 280mm | 140mm |
| 40mm | 240mm | 80mm | 320mm | 160mm |
| 50mm | 300mm | 100mm | 400mm | 200mm |
Step 1, The Tiles
After deciding on the 40mm square size, I went about creating some different textured squares. I used the 40mm MDF squares as the foundation for my tiles. They are after all the perfect size 😉
But before I started sculpting on them I figured it would be wise to seal the surface so that moisture didn’t cause the MDF to warp. So I gave them a quick spray with some primer.

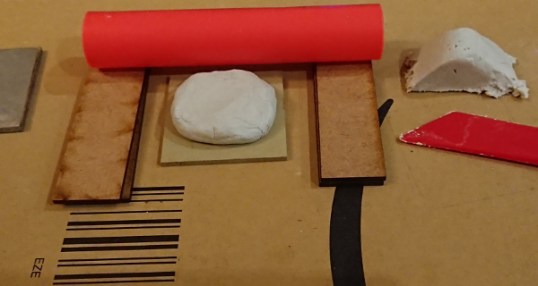
I once bought a block of DAS air drying modelling clay for a long forgotten about project (me not even start a project, never mind finish it – Good Grief! who would believe such a thing!). I thought this material would be ideal to cover the MDF square and sculpt texture in to it. I borrowed a roller from my son’s Play-Doh set, and I stacked up some MDF either side of the square to work on to enable a nice smooth even layer of DAS clay to be applied on top. The image below has two 20x80mm MDF bases of 2mm thickness stacked on top of each other, on either side of the square I am working on. The square is also 2mm thick so I ended up with 2mm of clay rolled smooth on top of the square.
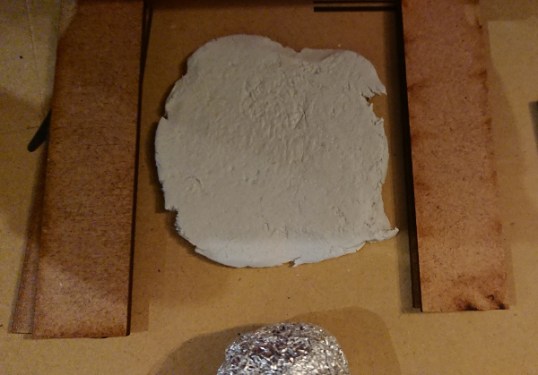
With the clay smoothed over the base I added some texture using a ball of tin foil.
I rolled the tin foil ball gently over the surface to create a nice stone surface looking texture. Depending how hard you press you can achieve different looking surfaces. Also some sides of the tin foil ball gave different textures to others depending on how the tightly the ball had been screwed up. Basically, I had a play around, and started again if I didn’t like what I saw.

Once the texture was added i then trimmed the excess clay off the sides of the MDF square with a sculpting tool. I think I must have bought some cheap plastic tools at the same time as the clay, but they did look similar to some of the Play-Doh tools in my son’s set too. When I trimmed the sides, I did so at an angle, roughly 45 degrees to the top, so that there is a chamfer running around the edge of the square. This should help separate the square from it’s neighbours on the completed board sections so that the grid layout is obvious.
I left it to dry, although as my son was also making things in the clay I also found I could dry them in a low oven at 50oC (he was less patient than me). Thankfully mine did not crack in the oven, whereas Josh’s spider wasn’t so lucky.
However I also found that even though I primed the MDF there was still an ever so slight curving/warping to the square. My second batch had a layer of sealer on top of the primer, and was not dried in the oven – they still curved. That said none of the warping is really that noticeable, so I wasn’t bothered by it in the end. I suspect its not caused by moisture absorbing into the MDF, but by the clay shrinking and pulling up the corners of the MDF.
This is what I ended up with after a couple of sessions sat down playing with clay. Three rough cut stone tiles, a large smooth stone tile, 4 small flagged tiles, a set of steps, and a riveted metal floor tile.
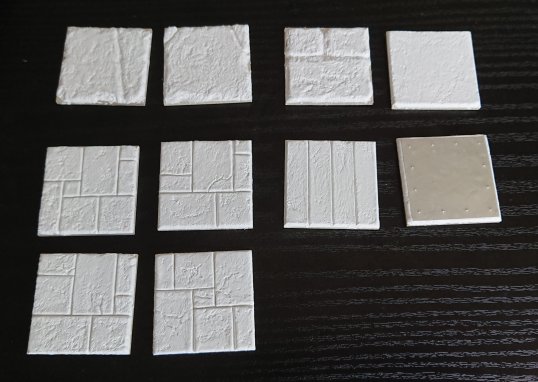
The lines in the above tiles were added with the edge of the sculpting tool. Very straight uniform lines for the flagged stones and steps, which was really easy to do. I just took care not to disturb the texture on the top and to remove any ‘burrs’ caused by carving the lines.
The rough cut stone was harder for me to get looking right. I ended up marking out where I wanted the pattern to be. I then removed a ‘V’ of clay along those lines. One side of my tin foil ball had a ridge line on it, and I rolled this ridge along the ‘V’ to texture the clay. I also squashed down the sides more and added slightly more severe texture to the top.
The metalled square is simply a piece of thick tin foil stuck onto of a smooth clay square. The thick tin foil was cut from the base of a pie we’d had for tea one even. The rivets were pushed into the underside of the tin foil with the tip of a ball point pen.
Next step mould making… but it’ll be in my next post.

Pingback: Splayedhammer Quest Project (part 4) | Splayed Paint Brush