I wrote this tutorial around about the release of the Black Dragon Iron Fang Pikemen upgrade kit and the new tier list for Butcher1, Claws of the Dragon, in NQ41. So it is quite a while ago now, and it was originally hosted on another website which seems to have now sadly disappeared from the web. The tutorial is broken into two articles as i used two slightly different methods, one using brass rod, the other using brass rod and tubing. This article will deal with method 1, using brass rod.
Method 1: Brass Rod
OK the basic idea is to remove the original shaft of the IFP’s pikes and replace it with a length of brass rod. Sounds simple doesn’t it.
The IFP unit and attachment have 5 different styles of pike hand. An over hand grip, an under hand grip, the unit leader’s arm, a thrusting forward grip, and finally the UA officer also has a thrusting forward grip.
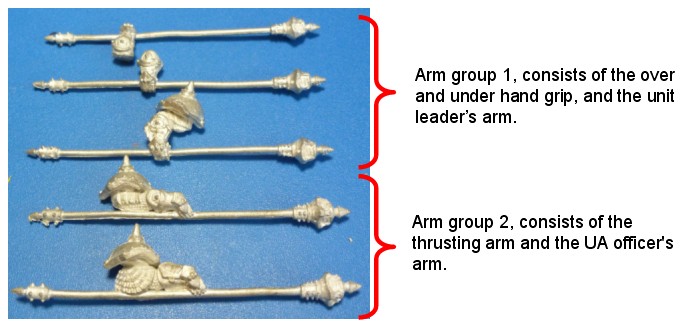
Although the same techniques are used on all the different arms I think one set is a little harder than the other, arm group 1 being easier than arm group 2. So I’ll show how I did both groups of arms.
Tools used:
- Clippers
- Knife
- File
- Pin vice & drill bits (I used a 0.8mm and a1.2mm drill bit)
- Modeling vice and two wooden coffee stirring sticks (optional)
Materials used:
I measured the rough diameter of the pikes and the length of rod I would need for each pike. You can get other materials, I believe steel rod and aluminum rod is available but where I got my stuff from brass had the largest selection of sizes. I suppose in theory you could also use plastic rod but the weight of the pike tip might be too much for the plastic to support without bending.
- Brass rod 1.2mm diameter, enough to cut 11x ~70mm lengths.
- Superglue (I know it’s a bit obvious but I may as well make a complete list)
Top Tip: Right before going any further grab a ruler and measure the total length of a pike. Make sure when you go buy your brass rod that you know this number off by heart because there is nothing more soul destroying than getting half way through a unit, especially when writing an article, and finding you didn’t buy enough brass.
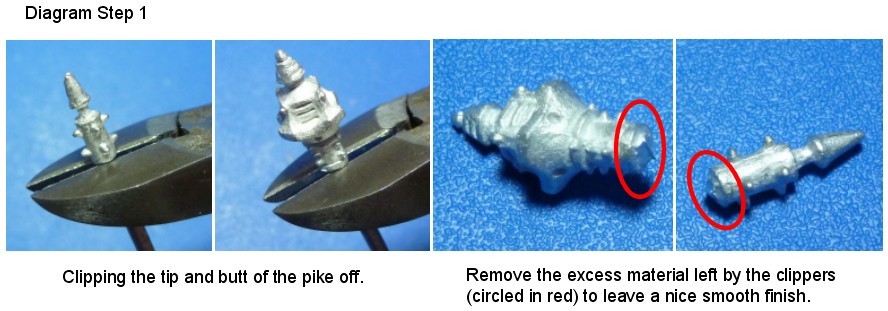
Step 1: Remove the ends of the pike
You need to carefully clip the head and butt of the pike off. I used the clippers with the flat side against the section I want to keep. Then I used a knife and file to give a nice clean finish to the cut.
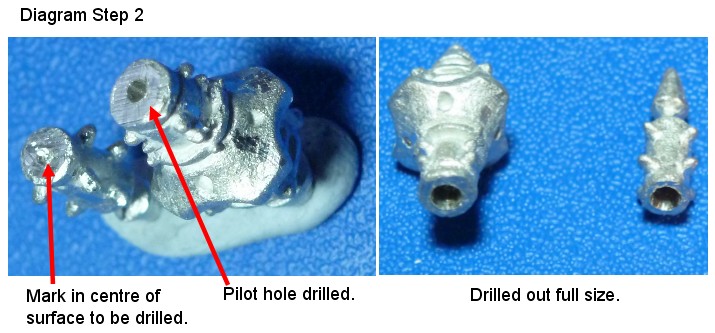
Step 2: Drilling out the pike tips
Once you have cleaned up the cut to a nice flat surface, mark the centre with the point of your knife. This is so that your drill bit doesn’t slip. Drill a hole for the brass rod to fit into. Do both the tip and the butt of the pike.
Top Tip: I drilled a pilot hole first with a 0.8mm drill bit. I then enlarged the hole with the 1.2mm drill bit. Two reasons for this, I find that drilling a pilot hole lets you be more accurate at getting the hole as close to dead centre as possible. Second reason is that you’ll find it easier drilling the larger hole if you pilot hole it first.
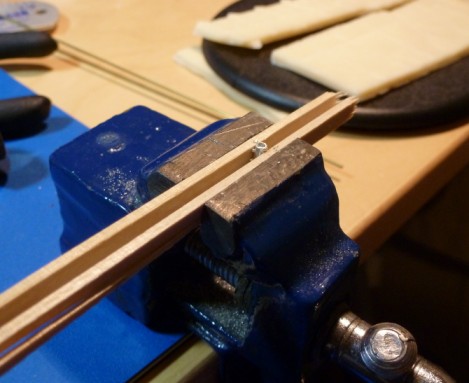
Top Tip: After drilling a couple of smaller ends of the pikes your finger tips will start to get tender after gripping the spiky bits of metal. So use a modeling vice to hold the part. Sandwich the part between two coffee stirrers so that the vice jaws do not damage the part.
Here is my set up:-
Step 3: Remove the pike from the hand
Dealing with the hand is in my opinion the hardest bit, because you do not want to damage the hand, but will be taking quite a bit of material away from that location so take your time for the next couple of steps.
Using the flat side of the clippers I cut as close to either side of the hand as possible for group 1 arms. For the group 2 arms I cut the front of the pike off in the same manner. However the back of the pike is a little different. If you just pull down on the back of the pike most of it will separate from the arm leaving a short section joined along the vambrace of the armour. I used the clippers to cut along this join in small sections, but a knife will do the job just as well. I cut the weapon shaft just behind the hand in the same manner as in front. This leaves a short section of the pike in the hand.

Step 4: Preparing the hand
Like I did in step 1, we need to clean up the cut surface of the hand. Square off the ends and either cut or file them flat. I used a knife, although I did not use Blu-Tack to hold the pieces while cutting, that would be silly 😉
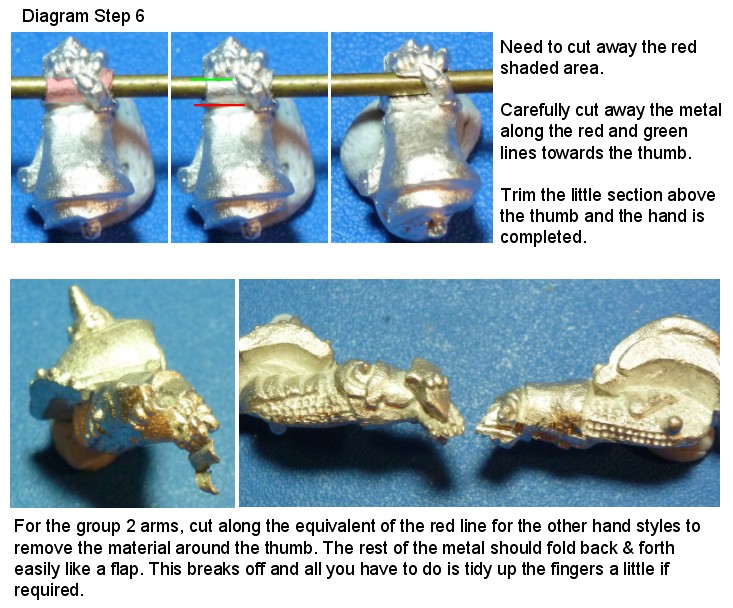
The last image in the diagram for step 3 shows a group 2 arm cleaned up like this. For those arms I also cut/filed the underside of the arm to remove the old join line from the old pike.

Step 5: Drilling the hand
Next up we need to drill through the hand. Following the same drilling technique I used earlier, I marked the drill centre with the point of my knife on both sides of the hand. Then I drilled a pilot hole on each side, I didn’t go very far into the hand at first as I was making sure I was happy with where the pilot hole was located. Once happy I drilled to about the middle of the hand from each side. Eventually the two holes joined up, I kept drilling until the drill moved smoothly in and out of the hand. I then did the same with the full size drill to enlarge the hole to take the brass rod.

Top Tip: Drilling the hole alternately from either end means that any misalignment of the drill holes occurs at the centre of the hand, rather than at one end or the other. This means there is very little chance of accidentally having the drill bit come out the other side through the thumb rather than the middle of the pike shaft, for example.
Step 6: Removing the last of the old pike
You will now have a hole drilled through the centre of the remaining shaft of the pike in the hand….hopefully. This next step could be optional, as I went and removed this last bit of the pike. However if you were to leave it there it would give a good foundation for gluing the brass rod in place, making the model sturdier. The downside is that you are left with a step in the shaft of the pike, which you could disguise as a handle.
To remove this last section of pike I carefully cut away the metal with a sharp knife. The metal is quite thin once you have drilled out the centre so is easy to cut away.
Top Tip: You could say that I did not buy a large enough diameter brass rod if I had a lot of material left to cut away. If I had taken one of the arms with me when I bought the brass I might have picked a larger diameter rod. Take yours with you.
Step 7: At last a pike to make you proud!
All the hard work is done now; all that remains is to assemble the IFP and their shiny brass pikes. I cut the brass into lengths to match roughly the original length of the pikes once the top and bottom were added. Without gluing anything I played around dry fitting models together to see how they looked and more importantly, in my opinion, how well they ranked up together. Once I had decided how to put them all together I then glued the bottom on to the pike. Then I glued the hand in position on the brass rod. Finally I glued the top of the pike in place.

Top Tip: Do not glue the top and bottom of the pike onto the brass rod before the hand is in place. You will not be a happy bunny.
Right to give you some idea of how long this takes I timed roughly how long it took me to do the last arm I had to do for the unit. So to go from the standard arm right through to attaching it to a model took about 20 minutes. I didn’t rush but that does include cleaning mould lines off the arm and ends of the pike. It also includes pinning the arm to the shoulder of the Iron Fang’s torso.
The assembled unit (no shields because I will paint those separate)

Top tip: It is worth thinking how to put together the whole unit. Some of the models you do not really have a choice with how to position the pikes. However the models with the over hand grips can be holding their pikes upright. These rank up pretty well with the other models, so you’ll never struggle to get into Shield Wall with those guys.

Pingback: Ironfang Pikemen – Brass tubing replacement of the spear shafts | Splayed Paint Brush
Pingback: Infinity: Converting Croc Men specialists – part 2 | Splayed Paint Brush