Following on from yesterday’s Croc Men Hacker article, this is about how I went about converting my Croc Men Forward Observer.

The conversion is made out of the following models:
- Croc Man Sniper
- Aguacile (with corn rows hair style) from the Nomad Starter Pack, or use a split box service such as ChoKonnit’s, like I did.
- Panoceania Antenna (think I had a spare left over from the Dronbot Remote box)
- Fusilier Hacker Combi-Rifle right arm (optional)
I have also cheated a bit, as I made a cast of the Combi Rifle arm from the Fusilier Hacker model from the Fusilier SWC boxed set (or use ChoKonnit’s split box service if he has the Hackers available). I needed the same arm for both this conversion and the Croc Men Hacker conversion. Well actually I just wanted the weapon, and you could just cut the barrel down on the sniper rifle. Go check out part 1 to see how the rifle was changed.
I wanted a different head to make the sculpt as different as possible from the original. For the FO I choose to use the Alguacile’s head from the starter pack. As this was going to be a clean straight cut i used the trusty razor saw. Picture below on the left is the original model’s box art, and the image on the right is after removing the head (I only remembered to take this picture after the conversion was complete).

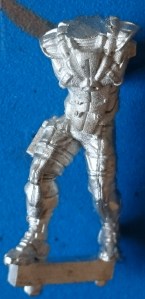
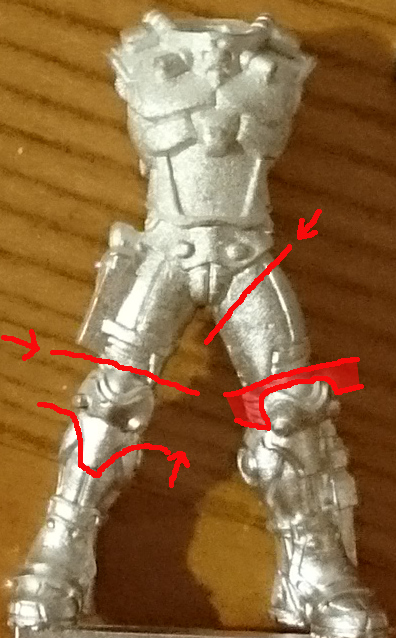
To vary the pose of the new Croc Men sculpt as much as possible I decided to make the FO be kneeling on one knee. This required a lot of careful cutting of the legs. After looking at the model carefully i decided to make the model be kneeling down on it’s right leg. With eth left leg in front. This was because on the outside of the model’s left leg there is a large piece of detailing (guessing something like a mine, or deployable repeater, or the knife sheath) that i did not want to remove or damage. I thought the best way to do that would be to keep that portion of the leg upright and hence as intact as possible.
I hope the image below helps my cutting description. First cut was straight through the top of the model’s left hip. I then cut the same leg off just above the knee, and spent a lot of time removing material from behind the knee cap (shaded red section on left leg) without damaging the detail on the outside of the leg.
On the right leg i cut just below the holster. I also cut up along the shin behind the lower part of the knee cap armour plate, as well as removing material from behind the knee cap.
I then put the legs back together in a way that looked OK. Due to the large change in angle of the left leg, I replaced the upper leg with a piece of brass rod. Taking care to get the length of it to roughly match the length of the upper leg. This allowed me to position the leg in such a way that made it easier to get the model at about the right height for the kneeling position. The slideshow below shows the repositioning of the legs from different angles. Some filing, bending , and general tweaking was required to get to this point. The model’s right leg was glued first to allow the final position for the left leg to be determined.
The legs were then Greenstuffed, filling in the gaps, sculpting a left upper leg, and finally matching the detailing of the original model (well as close as I could).
I wanted the left arm to be holding a pair of binoculars. To to this I removed the model’s knife either side of the model’s fist. I then drilled through the fist to remove the knife hilt from the model’s fingers. I then cut the hand between the thumb and forefinger and gently prised apart the hand straightening out the fingers to allow the model to hold the binoculars. Sorry no pictures of that process, however I did something similar in drilling out the hands when replacing the spears on my Ironfang Pikemen (link).
The binoculars were just two short sections of brass tube of the same length glued together. I also wanted to adjust the angle of the left arm, so i cut a small wedge of metal out of the inside of the elbow. I then gently bent the arm round to close the gap made by the wedge.
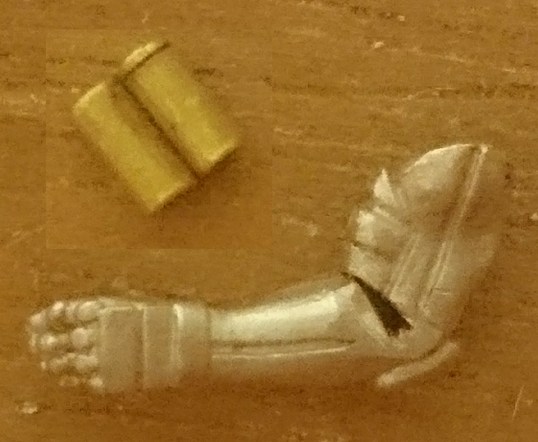
I also rounded off the forward corner of the shoulder. This allowed me to fit the arm at an angle that was different to the original sculpt and suggested the use of the binoculars. I added the Nomad head, pinned in place with brass rod.

The model then required some work with Greenstuff to fill gaps around the neck, at the shoulder joints, the left elbow, and to finish the binoculars.
That was the model completed, however as this was an entry into the Mayacast Masterglass 2015 Q4 competition, I wanted to emphasise the InfoWar aspect of the model more. So I decided to build a deployable repeater, and place it on the models base as if it had just been deployed before looking through the binoculars.
The repeater is based on (what i guess is) the repeater on the Panoceania Dronbot Remote. I also had a spare antennae from that set. Its basically a cylinder with a domed cap on one end and a couple of antennae.
I made the cylinder from a short section of plastic tubing, and Greenstuffed a dome on one end, with a little recess in the centre. I then drilled a recess into the side to fit the spare antennae into. Finally I wanted some way to make it look like it could be placed anywhere quickly. So i made a tripod out of the copper staples the blister packs are sealed with. I used those staples as they are chunky looking and have a rectangular cross section to them making them look sturdy at this scale. I used 3 pieces of the staple to make the legs of the tripod. Each piece was bent at the same location to make the ‘hips’, ‘knees’, and ‘ankles’. The tops of the legs were glued into the bottom of the plastic tube. The ‘feet’ were then cut to the same lenght.

The repeater was placed on the model’s base and the legs adjusted to suit the different levels of the base.
As you can see I was part way through painting the model’s base when I decided to make the repeater. So you can see that I paint the model, base, and repeater separately.
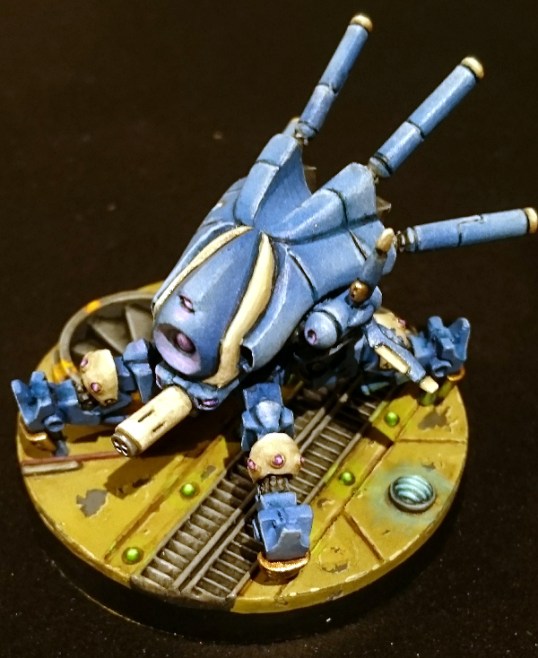
Finished model:

Pingback: Infinity: Converting Croc Men specialists – part 1 | Splayed Paint Brush