Welcome back to the second part of my Iron Fang Pikemen article. Previously I showed you how I went about replacing the Pikemen’s pikes with brass rod, now I will show you my second method where I replace the pikes with brass tube.
Method 2: Brass Tubing
The idea is the same as the previous method but this time replacing the pikes with tubing. The reason for the tube is because the outside diameter can match very closely with the diameter of the pike shaft. However the internal diameter is smaller allowing you to use a smaller drill bit to drill through the hand and not have to remove material from the hand to avoid a step in the shaft as described in step 6 of method 1. The end result is to have a much thicker looking shaft to the pike. A comparison of models using each method can be found towards the end of this article.
Tools used:
- Clippers
- Knife
- File
- Pin vice & drill bit (I used a 0.8mm drill bit)
- Modeling vice and two wooden coffee stirring sticks (optional)
- Mini pipe cutting tool (optional)
Materials used:
- Brass tube 1/16th in outside diameter.
- Brass rod 0.8mm diameter, you don’t need a massive amount, but it has to fit inside the tube.
- Superglue
Doc’s Top Tip: I actually bought two different sizes of tubing, again because I did not take a model with me when I bought the tube. One set was in metric, and the other imperial. The metric tube was 1.4mm diameter and the imperial tube slightly larger at 1.57mm or 1/16in. The metric tube had an internal diameter that allowed a 1mm brass rod to fit snuggly. The imperial tube has a larger wall thickness so needed a smaller diameter brass rod, playing around I found that a 0.8mm brass rod fit best. So it is worth going to a shop to buy stuff instead of just ordering over the internet to allow you to see what fits. I ended up using the 1/16in tube because it is a closer match to the original pikes but also because it uses a smaller internal diameter rod, which means smaller easier to drill holes, well in my opinion anyway.
Method 2, Step 1: Sizing Up
To be honest there is not a massive amount of difference in the first few steps of this method to the previous one. However as before I shall show the steps I undertook for both styles of arm (group 1 and group 2, see method 1 introduction). I laid the arm next to the brass tube and measured where I would cut the tube at. I used a marker pen to show where I was going to make the cuts. You can see I end up with two sections of tube to replace the pike shaft either side of the hand.

Method 2, Step 2: Tube Cutting
You can cut brass tube with a normal straight bladed craft knife using a rolling technique. Or you can use a mini version of a plumber’s pipe cutter. The one I used claimed to be able to cut tube down to 1/16in diameter, perfect! Except it didn’t, although it did get most of the way through I had to finish off cutting with the knife.
The rolling technique is simply pushing the blade on the knife down on the tube as you roll the tube back and forth with the knife. Go nice and slow otherwise you will end up with a messy cut.

Doc’s Top Tip: Do not use clippers to cut the tube. You will crush the tube as you cut it, making it useless. I bought the tube cutter expecting it to save time and effort, it really didn’t. If you are comfortable using the rolling technique to cut tubing then do not bother getting a proper tube cutter.
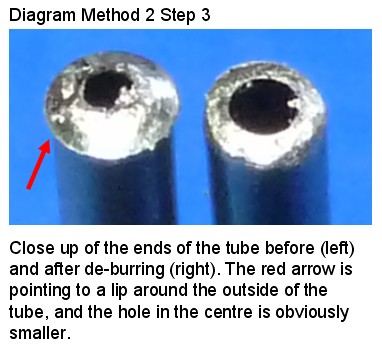
Method 2, Step 3: De-burring
After you have cut the tube to the required lengths you will have to de-burr the edges of the cut. If you do not do this then the brass rod will not fit inside the tube. All I did to de-burr the tube was quickly run a file around the outside and over the end. Then using my pin vice drilled into the end of the tube. This cleared the tube no problems at all.
Method 2, Step 4: Trimming Down
Cut off the ends of the pikes and remove the shafts of the pikes from the hands. Go read step 1 and step 3 of the brass rod method for more detail. You want to have flat surfaces at pike tip and butt. You also want flat surfaces at the hands perpendicular to the pike shaft.
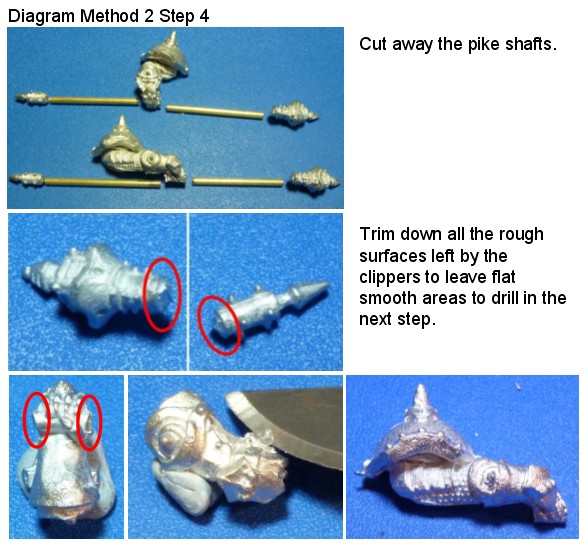
Doc’s Top Tip: This really is me being lazy, but I have merge steps 1, 3 & 4 from the previous method into one step in this method.
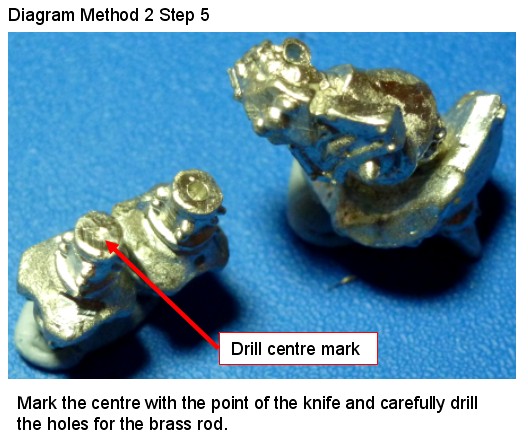
Method 2, Step 5: Drilling
Using the point of your knife mark the drill centres on the pike tip and butt, and on either side of the hand. Using the pin vice and 0.8mm drill bit I drilled a short way into the pike tip and butt. For the hand I drilled a short way in on one side and then swapped to the other side, alternating unto the two holes joined in the middle of the hand. This way gives you the best chance of getting each end of the hole to be exactly where you want it. The two holes may not be aligned perfectly so keep drilling until the brass rod passes smoothly through the hole.
Method 2, Step 6: Assembly
All that is left to do is assemble the pike together. To do this I used short sections of brass rod to pin the brass tubing to the model parts. The brass rod does not have to go along the full length of the tube, just a short way inside. So you do not need to use a lot of brass rod.
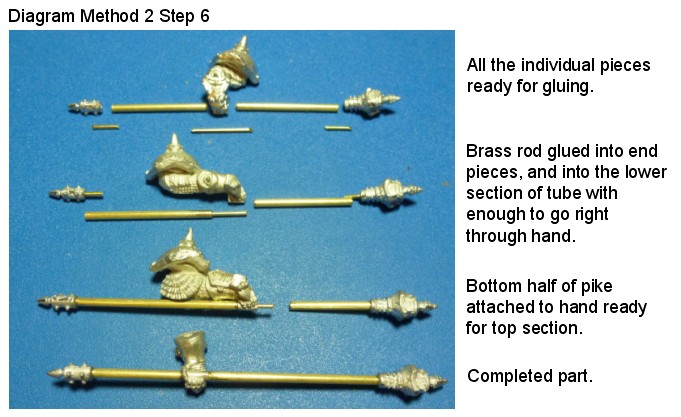
Doc’s Top Tip: Do one of each arm first rather than doing them all at once. That way you always have a complete arm for reference incase you mix bits up, forget how long the tube should be etc etc.
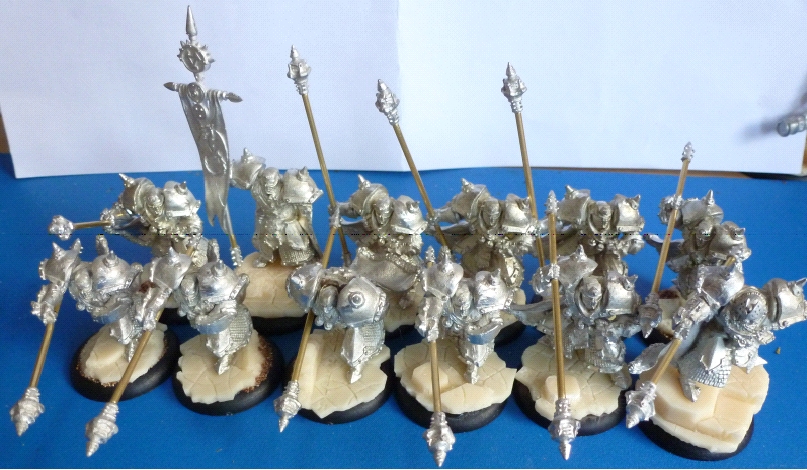
That is it for the unit, all that remains is to attach the arms to the torsos. The majority of my units armed are pinned in place. Here is a group shot of the second unit fitted with brass tubing. Again I have left the shields off to allow me to paint them separately.
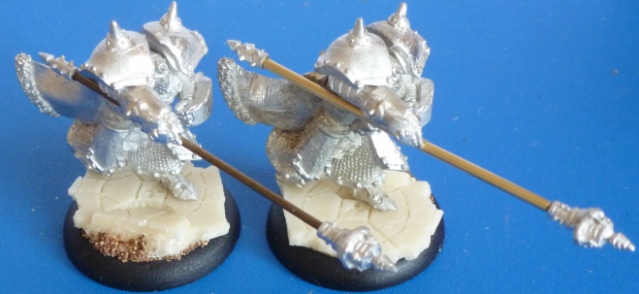
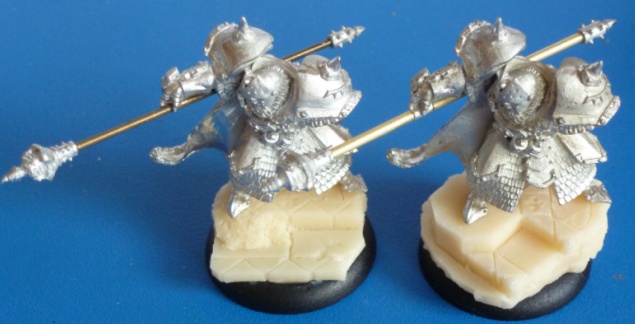
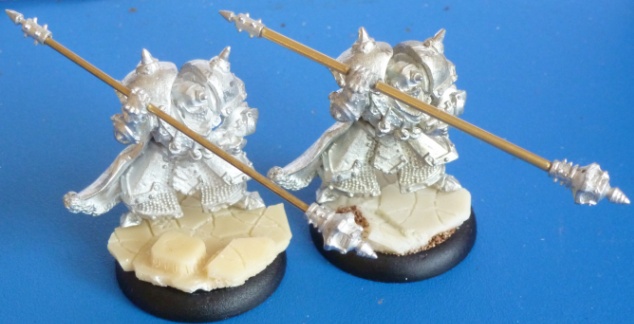
Below are some comparison photos of the minis using these two methods. The left hand model is method 1, brass rod. The right hand model is method 2, brass tube.
Standard Bearers
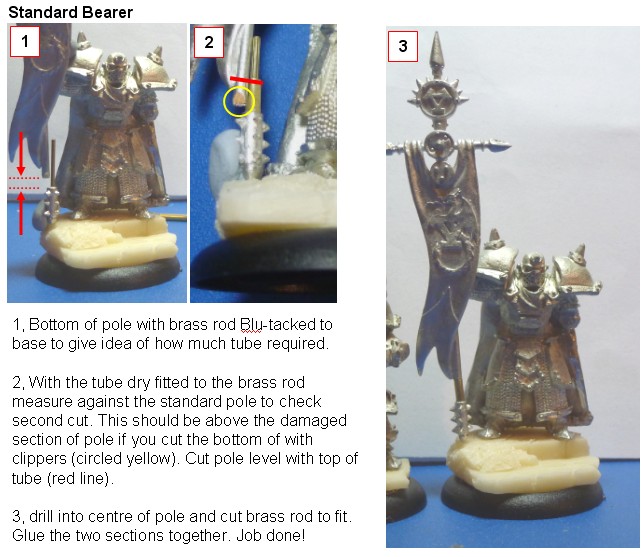
“Hang on, where are the standard bearers?” I hear you say. Well I am planning on using green stuff to extend the standard of the original IFP UA, as it is too short for my taste. In the process of doing that I will be using brass tubing to strengthen the standard pole using exactly the same method I have already shown you. However just to complete this article I will just quickly show you what I did to the Black Dragon standard. All that I wanted to do to the standard bearer was to extend the staff so that the base touches the ground. Similarly I planned to have the IFP models with the overhand grip hold their pikes upright, making them easier to rank up. The models you have seen previously have had tube cut to the same length as the pike shaft it was replacing. All that really changes is that you need to measure how much tube to cut from the model rather than just copying the old weapon dimensions.
After removing the bottom of the standard pole I cleaned it up and drilled a hole for the 0.8mm brass rod. A length of brass rod was glued in place, long enough to join the bottom section back to the standard, so about 20mm was enough. I could always cut it shorter, but making it longer might have been a lot harder. Using Blu-tack to hold the components in place I measured the amount of brass tube I thought I needed. At this point I had not cleaned up the damage on the standard pole caused by the clippers. So I added a few mil to the amount of brass tube I cut for the pole.
Dry fitting the components again showed me where I needed to cut the standard pole to fit the tube. I cut the pole level with the top of the tubing, cleaned up the cut and drilled up the centre of the standard pole. Once again I dry fit the components just to make sure they were the correct length and then glued it all together.
“Squad, stand at ease”
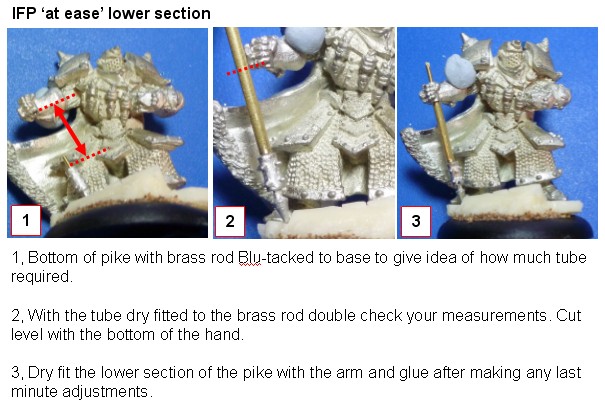
For the ‘at ease’ Iron Fang Pikemen I cut away all sections of the original pike, cleaned up the cut surfaces and drilled holes in the pike ends and through the hand. I then glued a section of brass rod into the bottom of the pike. Using Blu-tack I dry fitted the hand and the bottom of the pike to the model/base. From this I could measure how much brass tube I needed to cut, I cut the tube at a point level with the bottom of the hand. Once the tube was cut I double checked how things fitted together before gluing.
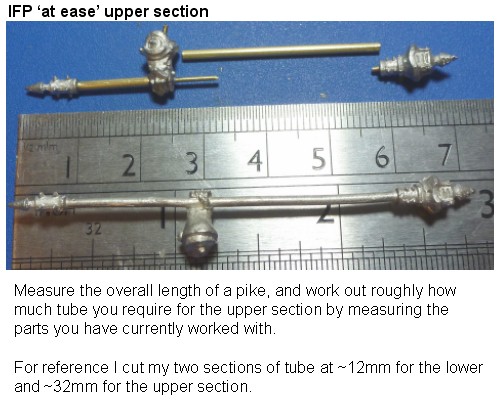
At this point I had the bottom of the pike glued to the hand and the top of the pike with a section of brass rod glued in it. All that remained was to cut a section of tube for the upper section of the pike. To do this I measured the overall length of an unmodified pike. I then measure the overall length of the glued together lower section of pike including the hand along with the length of blasting charge warhead. A little bit of math later and I had cut the section of tube for the upper section. I then just glued it all together.
I cut away all sections of the original pike, cleaned up the cut surfaces and drilled holes in the pike ends and through the hand. I then glued a section of brass rod into the bottom of the pike. Using Blu-tack I dry fitted the hand and the bottom of the pike to the model/base. From this I could measure how much brass tube I needed to cut, I cut the tube at a point level with the bottom of the hand. Once the tube was cut I double checked how things fitted together before gluing.
At this point I had the bottom of the pike glued to the hand and the top of the pike with a section of brass rod glued in it. All that remained was to cut a section of tube for the upper section of the pike. To do this I measured the overall length of an unmodified pike. I then measure the overall length of the glued together lower section of pike including the hand along with the length of blasting charge warhead. A little bit of math later and I had cut the section of tube for the upper section. I then just glued it all together.
See above for the picture of the full unit.
That’s it for this article, I hope you have found either or both of those methods useful. Thanks for reading!

Pingback: Ironfang Pikemen – Brass rod replacement of the spear shafts | Splayed Paint Brush
We actually supply these brass and copper tubing for hobbies, call us up for any questions regarding sizes and shipping for any hobby jobs.