This was my hobby Christmas present from my wife and son, and what a cool present it was too. It is a great model, and I was pretty eager to get it built and see what it looked like. However I didn’t get very far with that over the holiday period and have only just got it assembled this week. Mostly because of lack of hobby time but I was also wondering how I was going to secure the wings on the model as there isn’t much contact area for glue, and not a whole lot of metal to pin in to. This article is about how I pinned the wings on the Seraph.
These are the parts in question, two wings and a backpack that sits on the rear of the TAG’s armour. You can see the right hand joint fairly clearly. A stub on the back pack fits in a corsponding socket on the wing. A key on the wing slots into the grove on the backpack to help prevent the wing rotating on the stub. But there is a lot of wing providing a large moment arm ready to pop the joint at, what i suspect would be, the slightest nudge, if the model fell over for example.

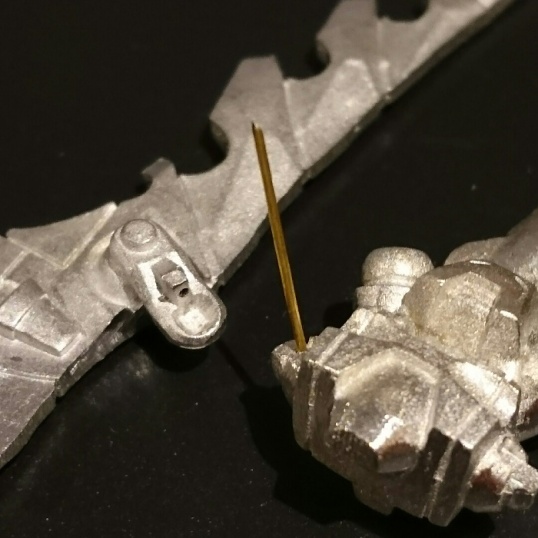
I used a 0.5mm drill bit and the same diameter brass rod to pin the wings to the back pack. I drilled into the part of the wing forming the key of the original joint. This key fits into a slot on the back pack, while a stub and socket form the main joint. I also drilled at an angle that would take the drill bit to the centre of the largest volume of metal of the wing. This would put the brass pin at angle to the main joint of the wing. I then tried to match the location and angle in the other half of the joint. The image below shows the drilled hole in the wing, and the drilled hole in the back pack with the brass rod in place.

The image below shows the angle I was trying to achieve with the pin. You can also see that this allowed me to drill into the largest volume of metal of the wing. Rather than through the hub at the wing joint.

The image below shows the pin cut to lenght and the two parts about to lock into position. The wing wouldn’t go straight into place because of the angle of the pin in relation to the model’s own stub and socket fitting. This was what I intended as the interference between the two should help hold the wing in place (and in fact as i dry fitted this wing before gluing I can confirm that it did stay in place with no glue). A little pressure pops the socket over the stub and slightly bends the pin holding it all in place.

After adding a small amount of super glue into the joint I used a small amount of pressure, as mentioned above, and popped the stub into the socket on the wing. Again with minimal pressure I could gently manipulate the joint to get the wing at the desired angle before the glue dried.

Do the same to the other side and Bob’s your uncle. Wings pined and glued to the back pack:

I have to admit I was a little paranoid about how effective my pinning would be. There is a lot of model hanging off a slender joint. It would not take much force at the end of the wings to pop the joint. With this in mind I wanted to try and reinforce the joint with Greenstuff. So i carefully bulked up the joint from underneath slightly. This was so that I didn’t spoil the visible parts with a big blob of Greenstuff. The image below is how it ended up looking.

While I had the 0.5mm drill bit and brass rod out I figured I’d pin the antenna to the top of the Auxbot too. This is a really fiddly small part that if left unpinned is just begging to be knocked off at some point. The image below shows the side view of the part being drilled, with an inset picture showing the front view. This is a delicate part and I took my time pinning this to ensure I didn’t mess it up.

Measuring up the pin to see how much needed cutting off, and double checking I’d drilled in the right place on the Auxbot (I had – phew).

Auxbot with antenna glued in place. Job done!

Here is the completed duo, Seraph and Auxbot.

It just so happens that this model both fits in the Datashpere 2016 Q1 painting challenge category, and with the Lost Hemisphere Paint The Target theme. The Datasphere challenge requires an Infinity model with a speed greater 4-4 (due the end of Feb) and the Paint the Target challenge requiring something new (due end of Jan). Hopefully this will give me the motivation to paint her up and I will make at least one of those deadlines for the model.
So now to paint it!