
This is the third instalment of, hopefully, 6 posts giving my thoughts on assembling the Godtear early access models. This post is about Ræth Marid, the Unbroken Tide, and his Whirlpools. The previous posts can be found here:
These are the models’ components straight out of the box. They are very large lumps of metal! The sculpts are really nice with not much work required to clean mould lines off them. A few minutes with a craft knife and a file removed all of the noticeable mould lines. It’s almost like there is a pattern forming, and that this statement wasn’t just copy/pasted from the earlier posts.
Front view:

Rear view:

In terms of clean up and assembly we have two extremes with this set of models. The whirlpools are really simple one-sided one piece models. Ræth Marid on the other hand is a large multi part model.
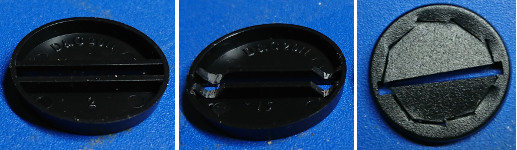
Whirlpools
Starting with the easy models first. They had mould gate on the edge which I cut and filed away, all that remains is to put them on their bases. If you want them on bases, I don’t suppose there is any reason why you have to mount them on a base. However I found when I put my on their bases that there was a gap running around the edge. There are three things you can do to fix this.
- Fill the gap with something, like greenstuff.
- File the bottom of the whirlpool model flat.
- Cut the centre of the base out, so only the edges of the base touch the whirlpool.
I couldn’t be bothered with 1 and 2, so I cut the centre of the base away. It sounds like a lot of effort, but it is quite easy to do, especially if you don’t need to be neat. Here’s how I did it:
Cut a ‘v’ shaped notch at each end of the slot’s sides, if you don’t do this the base will break – trust me. I did the cutting on the first one with a craft knife, but did the others with side cutters because its faster. Once the notches are cut flip the base over, and cut a very rough circle by pushing the craft knife down onto the base.
Glue the whirlpool on top, and you wont be able to see either a gap around the edge, or the rough cutting job you’ve done on the base.

A lot of writing for such simple models.
Ræth Marid, The Unbroken Tide
After dry fitting the parts together I decided early on to pin the arms and torso. The fit of the head to the body was good enough to hold without any glue whilst I was dry fitting Ræth . This is why I decided not to bother pinning the head in place.
When position the torso on to the legs there is a large gap between the parts. I thought I would try what I did to Golem (link) and see if that closed the gap. I filed the top of the domed locating key flat, I also drilled a 0.8mm diameter hole into the centre to use for pinning later on. This didn’t close the gap, like it had done for Golem. I then started to shave the edges of the dome off to try to get the key to fit in the recess on the torso and hopefully close the gap. I seemed to be removing a lot of material and not achieve much gap closure. I got fed up of this so I cut away the locating key completely to leave a flat surface with my previously centre drilled hole in it.
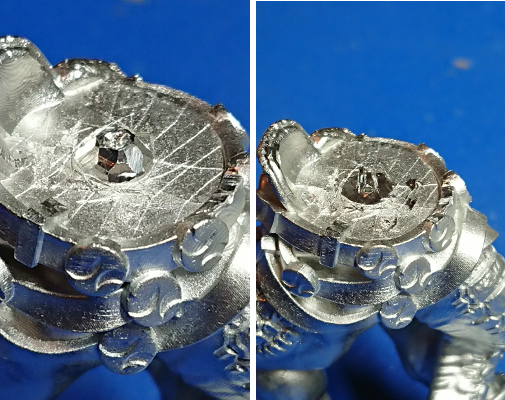
This closed the gap, however there was still a slight gap behind the large armour-plate forming part of the belt. The gap was caused by the armour not filling the recess that was allowed for it on the torso. I decided the best way to fill this was to use greenstuff to sculpt back in to place the abdominal muscles that would have been in there before the recess removed them. My thinking here was that the gap was large enough to be able to see them any way but if the parts did squeeze out the greenstuff a little then it wouldn’t really matter.
Note that I’m no sculptor, the abs sculpted into place were only rough shapes to begin with, the intention always being that they would be mostly obscured, and only really seen if the gap was not filled.

You may have already noticed in the above left image that I had already drilled the 0.8mm diameter holes in the waist and in each arm socket for the pins to hold the parts in place. I just drilled straight into the bottom of each recess.

With the glue and greenstuff drying at the waist I started working on the arms. Its worth mentioning that you should probably do one joint at a time when working with greenstuff in the joints, as I am here. However, I am not very patient and wanted to get the model built. I had mixed up one batch of greenstuff and did not wait for the previous joints to cure fully at all before working on the next.
I marked the drill centres with the point of my craft knife on each of the dome shaped keys for the arms and drilled 0.8mm holes in them. I then worked on one arm to completion before moving to the other. I first assembled the joint without glue, dry fitting the parts together. I positioned the arm within the socket and got it to sit how I wanted by bending the pin. While I was doing this I was looking at the gap and how it closed up, keeping in mind where I would want greenstuff to be positioned to both reinforce the joint and squeeze out to where I wanted it.
After taking the dry joint apart I straightened out the pin, and glued it in place. I then placed greenstuff around the edge of the arm’s joint. A thin sausage placed at places where the gap was small and closed up first while I was watching earlier – usually on the inside of the arm. Thicker sausages were placed on the outside of the arm, and the thickest sausage towards the rear of the joint.

Glue was added to the joint’s pin, and some of the surrounding metal and greenstuff – bear in mind you do not want superglue squeezing out of the joint with the greenstuff. That gets real messy quickly! So go easy with the glue. Then I repeat how I fitted the parts together while i was dry fitting them. You can control where the greenstuff gets squeezed out a little by how you bend and push the arm into place.
Once positioned I removed the excess greenstuff where a little too much had squeezed out, and filled in any other areas where not enough greenstuff was in the joint. I then did my best to sculpt surface detail to match the surrounding areas. In the case of Ræth that meant scales. This is where working on one joint only and letting it cure fully before going on to the next would have been really beneficial. Allowing more working time and with less pressure to get the job done.

I also did the head in the same way, except without the pin. As the gapping was much less severe for the head only small sausages of greenstuff were used, and no sculpting was required.
With Ræth now assembled I turned to his base. When I stood him on his feet it was obvious that they weren’t flat enough on the bottom to have a hope of standing him unsupported. I did intend to pin him to his base, and also use some greenstuff to secure him too. I also thought it would be a good idea to try to flatten some of the underside of his feet to get the attitude I wanted for his positioning. In the image below I have highlighted in yellow the areas where I used a file to level off the soles of his feet. The red dot is where I drilled a 0.8mm diameter hole to place the supporting pin – I did not glue this in place at this time.

I wanted Ræth to have some water effects on his base of some description. To this end I cut the centre out of his standard 50mm base, and glued a 50mm plastic disk underneath the remaining rim. Then I tidied up the inside of the plastic rim to give me a recessed base to work with. I bent the brass rod into a shape that would support the model on the base and glued it to the base after deciding where it should go.

Once the glue was dry I then used greenstuff to fill in the inside of the rim, and to cover over the brass rod glued to the base. I drew round where the feet would go with pencil, and scored cross-hatched lines into the plastic to give a key for the greenstuff to hold on to. I then placed two foot sized blobs of greenstuff on the base where the model’s feet would go.

Adding glue to the pin, and a little to the greenstuff I pushed Ræth into position on his base. I tidied up the greenstuff that was squeezed out from under the feet. Finally here is the assembled Ræth Marid.


I hope these articles are of some use to you, even if its just an idea for a different way to do something.
Next up are the Elves, according to the vote (link).
