
This is the second instalment of, hopefully, 6 posts giving my thoughts on assembling the Godtear early access models. The first post talking about Shayle and Golem can be found here. This post is about Blackjaw the Exile and his Orc Savages.
First up, some straight out of the box photos. Before any cleaning up or assembly has taken place.
Front view:

Rear view:

Clean Up
The model castings are again fairly decent. No issues with mould line removal and it was achieved with a file or knife blade. I did notice on the Orcs some areas where I believe the mould is starting to tear allowing additional material to obscure details/intended surface. These were in areas where I imagine there are significant undercuts in the mould. As such they tend to be out of sight or away from focal points of the model. I’ll highlight some of the more noticeable/troublesome ones on the images as we go.
Basing
I have decided to buy some Ancestral Ruins resin bases from Tabletop-Art. At the time of writing I have yet to receive them through the post, no surprise as they’re coming from Germany. However, I have started prepping the models for the bases. The tabs on the feet have been removed, the feet cleaned up and filed flat ready for the pin and attaching to the base.

So in reverse order…
Orc #5
There was a mould gate at the bottom of this Orc’s tabard, and a delicate hook on the sword to clean up. I decided not to pin the sword in place, as it looked like a nice fit onto the arms with a lot of contact area for the glue.

Orc #4
No clean up issues here, just tidying up mould gates and vents to do. I decided not to pin either the trailing foot or the sword to the model in this case. However prepping the model for attaching to the resin base required some thinking.
From the angle the tab for the slotted base attached to the foot it appears that the leading foot is intended to be flat on the floor. This would put a lot of the model’s mass over the rear of the base, making it a bit unstable. It also looks unnatural to me, so I considered how I could base it to make it both more stable and look more natural.
My first thought was that it looks like the model is jumping over something. I think this would look really cool but without the actual resin bases to experiment with I decided not to go this route. The other option was to tilt the model forward bringing the front leg under the model’s body. This looks a more natural position and I suspect how it was intended to be posed. This puts the model up on its toes and makes the contact area tiny for such a large model.
My solution was to bend the toes of the foot up, by pushing the model down onto the work top. This made the foot look in a more natural position, in my opinion. It increases the contact area for glue, and gave me a better angle to pin the foot to the base.

I drilled into the centre of the foot just behind the ball of the foot. The drill was perpendicular to the foot. I only drilled a shallow ‘dip’ about 1mm deep. If I had continued drilling in this direction I would have soon drilled out of the top of the foot. The purpose of this ‘dip’ was to allow me to drill the hole for the pin at an angle to the surface I was drilling in to. I wanted the pin to go up the line of the leg. This would allow a longer pin to be used making the model a bit more secure on the base (when they get here).

Orc #3
This orc has a channel/vent between the left thumb and hip. Take care not to chop off his thumb here, and there was a mould line running up the thumb too.

I decided to pin the sword in place. I suspect you know the drill by now – come on you were expecting that pun at some point weren’t you!
File flat the top of the rounded key, that goes in to the recess on the wrist. Mark the centre point to locate the drill bit with the point of your craft knife’s blade. Drill the holes in both sides of joint. Cut the brass rod to length and pin joint together.

Orc #3
(What? Yes, the tabs say there are two ‘Orc-3’ models, this amused me enough to match their naming convention.)
This is a single piece model, and hence no assembly required. However I had trouble cleaning away some areas of miscast material on the tops of his gaiters (they aren’t boots or socks so gaiters will have to do). Arguably this wasn’t worth the time or effort, but I tried to cut away the miscast material and then repair the damage I had done to the area as best as possible with greenstuff. This orc also got a little attention on the pommel of the left hand sword, between the wrist and the pommel was a little excess metal.

Orc #1
This particular model looked like its left hand sword blade had got bent in the box, as it had got stuck under one of the side flaps of the cardboard box lid. However, after straightening out the blade I noticed that where the blade attached to the hilt looked weird. It actually looked smooth and lacking detail with an odd shape in comparison to the rest of the sword along with a thick line of flash. I think this location is miscast. The blade was bent over a fair amount and appears to have significantly yielded the material as once I’d straightened it up, it felt very weak. I decided to cut that section out (whether its miscast or not) and pin the sword to the hand.
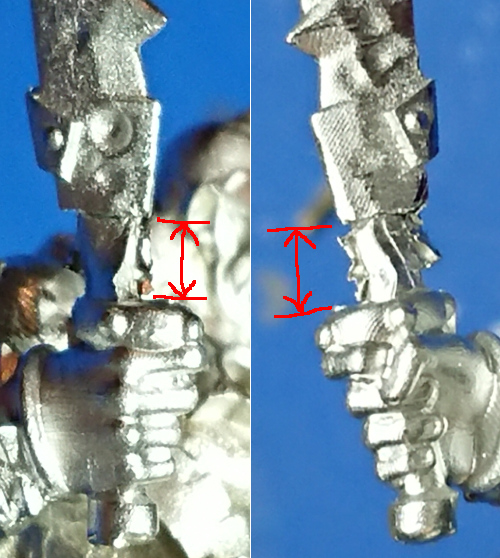
I cut the questionable section out with side cutters. Then trimmed back the rough edges with a craft knife, finally making sure I had a smooth finish with a file. I used 0.8mm brass rod for the pin because rather than supporting the joint, the pin in this case is the joint. I felt that 0.5mm brass rod would be a bit ‘weedy’ for the job. Besides it’s a sizable sword able to take a 0.8mm drill bit and it’s likely the sword will get knocked at some point. I marked the centre point for the drill bit and drilled into the sword. Note that centre point I marked was roughly in the middle of the widest part of the sword, towards the back. I started drilling using the 0.5mm just as a precaution. Once I was happy the 0.5mm bit was central and where I wanted to go, I swapped to the 0.8mm bit and finished drilling.

With the sword drilled I moved on to the hilt. Now as I had drilled towards the back of the blade, I needed to do the same to the hilt. I marked the centre point to drill on the fore-aft centreline but just behind the midway line across the hilt. Doing this ensures that the blade sits well on the hilt when put together.

Finally, don’t forget to attach his top-knot, I did! I pinned it on with 0.5mm brass rod, you’ll be pleased to know there’s no pictures – I was heading out to work.
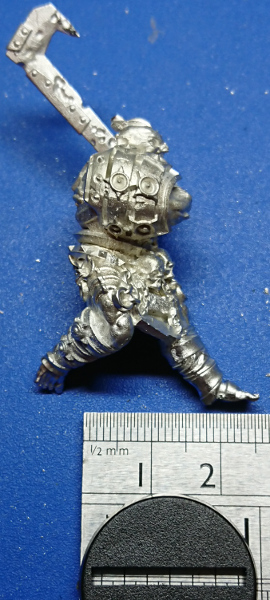
Blackjaw the Exile
Finally the main man himself! He was easy to clean up for the most part. I did have difficulty in getting the tabard to fit. I actually thought from looking at the parts that it would slot perfectly into place. Sadly it didn’t, and I puzzled over this for ages carefully shaving away material from Blackjaw a little at a time expecting it to fit eventually. I’ve highlighted where I took metal off below (in red). But in the end I needed to fill gaps (highlighted yellow) with greenstuff, and I could have saved myself some time if I’d just accepted that in the first place.

The gaps all greenstuffed, with a little armoured belt detail added back on.

As has already been noted on the Godtear Facebook group, he is missing his top-knot in comparison to his render. I decided to have a go at needed sculpting that at the end. I’m not great with greenstuff, fill gaps yes, sculpt detail not so much. I put a blob on the top of his head and scored lines and teased it out with a knife as best I could to detail it and give it shape. I should have left the greenstuff to harden slightly but it was getting late and just wanted it done.

Last thing to do was to pin the axe in place. I’m not going into detail this time, i used 0.5mm brass rod – following the method used throughout this article. That said, I did use a little blob of greenstuff in the joint when I was gluing it together.
I have a video of myself pinning this joint which I recorded to show some guys at my club how I pinned models. I’ll include a link just in case its useful to some one. (YouTube link)
Savages Assemble
Fully assembled, sans bases.

Edit: OK its been mentioned by SF that Blackjaw was redesigned and the top-knot was dropped from the redesigned model. It’s interesting to note that there are a umber of changes from the render posted up on the SF store. There are two Orc models (Orc 1 and Orc 3, numbered from L to R) which never made it into metal, as well as Blackjaw’s top-knot.


Pingback: Assembling Raeth Marid | Splayed Paint Brush