If you’ve visited my blog before you may have already seen the post about the initial concept and build for my Guild Ball goal marker, and also the detailing and finishing touches post. This post not a step by step guide to how I painted my goal, more of a general description. Plus of course a load of pictures of the finished goal marker.
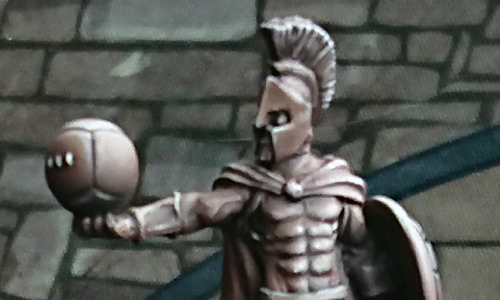
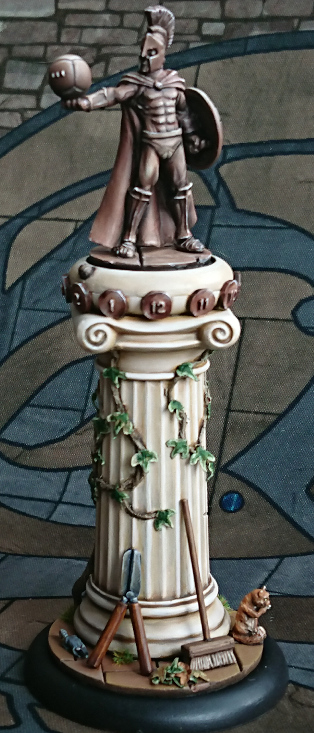
Bronze Statue
I painted the statue using a recipe from Angel Giraldez Masterclass Volume 2 , the second in a series of books I really like. The books are Infinity orientated and also use an airbrush for the earlier steps, so may not be to everyone’s taste. The colours I used are as follows:
- Mahogany Brown (link).
- Orange Brown (link).
- A 4:1 mix of Orange Brown and Sunny Skin Tone (link).
- Lined with a mix of Hull Red (link) and Black (link).
- Highlighted with White (link).
- Glaze of Orange Brown.
- Shaded with Hull Red and then Black.
Here’s my finished statue, and the VP score plates were painted in the same manner.
Stone Column
Its probably worth mentioning that the goal marker was sprayed AP Black (link), and then a light spray of AP Leather Brown (link) over it, except for the statue.
For the column I am using a paint recipe developed by JTY, a seriously talented painter I know, he just hasn’t written a book yet :). To see how this should end up looking check this out link. Its an old recipe now and I have used it on all my Warmachine models in the gallery in the links above.
The original recipe uses Foundry Paints and GW washes. For those that don’t know Foundry sell their paints in palettes of 3 pots of a colour. A shade colour, a base, and a highlight, respectively known as colour A, B, C.
JTY’s recipe:
- Base Sand A, B, & C. Link.
- Canvas C Link.
- Boneyard C Link.
- Devlan Mud wash (although I now use AP Strong Tone).
- Gryphon Sepia wash (although I now use AP Soft Tone).
First base coat the masonry in Base Sand A. Wash entire masonry with Gryphon Sepia. Highlight/drybrush the whole thing with Base Sand A, same again with Base Sand B, followed by Base Sand C. Now highlight the stones with Boneyard C, then highlight the stone edges with Canvas C. Finally the a wash of Devlan Mud is used in the heaviest shaded areas.
Here is the column completed part way through the overall paint job.

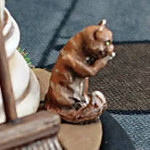
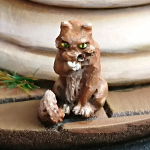
Painting the Cat
The cat was painted using colours close to hand, this saved trying to decide what colour cat to paint ;). Since that mean’t orange paint was closest I googled ‘ginger cat’, to see what sort of markings would be appropriate in the fur.
- Orange Brown (link) base coat.
- Sunny Skin Tone (link) stripes, underside, paws, and the tip of the tail and ears.
- A wash of AP Soft Tone (link).
- An off white (can’t remember what it was now) was used on the paws, tail tip, underside.
- A final wash of AP Soft Tone.
- The eyes were painted Black & white, and then a Yellow Ink (link) was used to add the colour.

Painting the Rat
The rat was quick to paint, it set off with a coat of a medium grey colour, and I just played about adding a pale pink to the mix until I was happy with how the rat was looking. Then just shaded it and finished off with some little details.
- Base coated Grey Primer (link).
- The tail was painted Pale Flesh (link), this was then used with the above grey to blend from pink at the tail tip to the grey body. The ears also had this treatment, but lets not kid ourselves that I blended from grey to pink on those tiny ears. The pinky-grey mix was also used to highlight the body of the rat.
- Shading was then applied to the rat with Black Grey (link) with a small amount of AP Soft Tone (link) mixed in. This was also used to darken the rat’s nose.
- The eyes were painted black and then a white spot added, while the teeth were painted with the same off white as the cat.
Gardening Tools
The blades of the shears were another attempt at the non-metalic metal technique. I had a pair of scissors handy to look at and to try and copy how the light reflected off the blades.
- Base coated Black Grey (link).
- Edges highlighted and then blended across the flat surfaces with Light Grey (link).
- Edges highlight with white.
- The above Black grey was then used to shade the shears.
- Soft Tone was used to add a little dirt/rust look to the metal.
Brush Bristles
Another simple job – I just made this one up, no reference materials required lol.
- Base coated P3 Rucksack Tan (link).
- Washed with AP Strong Tone (link).
- The bristles were highlighted with P3 Moldy Ochre (link).
- Final wash of AP Soft Tone (link).
Wood Work
The wooden handles were probably the hardest of the accessory details to paint. Just because the wood grain required a steady hand with a fine brush.
- All wood was base coated AP Leather Brown (link), this actually matches the colour they were spray undercoated.
- Then with a fine brush I painted thin lines to represent woodgrain and knots. This was done using Hammerfall Khaki (link).
- The wooden handles of the shears were washed with S75 Inktence Wood (link) but I didn’t like how this turned out. So this was not applied to the brush at all.
- The brush and the handles were washed with AP Soft Tone (link) a couple of times.
- Finally some AP Alien Purple (link) was mixed in with AP Strong Tone (link) and applied heavily to the shears, and more lightly to the brush.


Flag Stones
The flag stones I had a little difficulty with. I wanted them to match my Guild Ball pitch ideally. However I found that too much of a challenge, this is as close as I got. All the pictures have been taken with the goal stood on my pitch as a back drop. There are a number of slightly different coloured stone flags that make up the base. I think they are as follows:
- AP Leather Brown (link) blended with Middlestone (link).
- P3Bloodtracker Brown (link) blended with Green Grey (link).
- P3 Bloodtracker brown blended with Middlestone (link).
Damn, looking at the close up pics, I need to go back and paint the edges of the resin base topper sat in the plastic base recess 😦 .
Ivy Leaves & Vines
For the vines I was pretty lazy. As they were simply painted a base colour, but not a solid coat so that the undercoat was still showing in the deeper recesses, and then it was treated to a heavy wash.
- Base coated Green Grey (link).
- I think there might have been a quick light drybrush of something like Hammerfall Khaki (link), the pot was certainly on my painting desk.
- Washed with AP Strong Tone (link).
For the ivy leaves I used ‘Decorplus Leaf Combi-Pack’ by Antenocitis Workshop, but they look like they have stopped selling them, I guess these might be similar a product. They are a mix of brown and green leaf litter. I picked out the greener ones to glue to the vines, although you could use them as is I added some colour to them as well to give them a variegated look.
- I painted a cross of Olive Green (link) in the middle of each leaf.
- The edges were highlighed Thrall Flesh (link).
The leaves on the floor were a mix of the above painted leaves and untouched brown leaves from the pack. Once glued in place they were given a light wash of AP Soft Tone (link).
Completed Goal Marker
Here’s what you’ve all been waiting for, well assuming you bothered reading all that and didn’t just skip to the bottom :). The completed goal marker in all it’s glory.


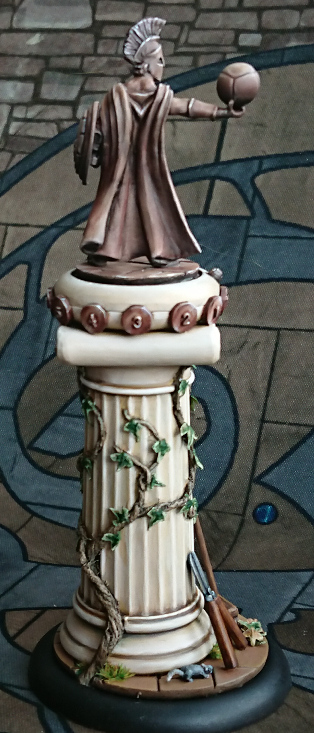
Now, I just need to learn how to rack up those VPs in Guild Ball to get some use out of that statue’s VP counter!
I’ve included links to the various paints I’ve used through out the article, but apart from the two recipes by the pro painters at the start of the post, there is no real need to use the paints/brands I have used.
Now please go and get your Guild Ball model fix at EG, so I can skim a bit of commission off the top of your spending 😉
