
I have been planning on building a goal post for Guild Ball for some time. With an upcoming event running at a local gaming club soon, I felt I should pull my finger out and get a goal built. The main sticking point I have had in the past in building a goal is actually deciding what it should look like. Do I theme it to a specific team? Do I theme it with my Guild Ball pitch and terrain? Should it track the score, and if so victory points or goals? And many other questions I never finalised an answer to… until now!
The Concept Sketch
After starting down the road to design a GB goal, for what feels like the 100th time, this time I created a sketch. The idea being to get a visual representation together that I was happy with to work from, and stop me from continually completely changing my mind. I settled on a generic goal not tied to a specific guild, yet one that could be associated with the Masons because that is the team I am currently playing. The goal will match the basing for a couple of my teams, and will hopefully tie in to my GB pitch. It should be relatively fast build with no complex scratch building needed. It should have a definite presence on the pitch yet be easy to transport/store between games.
So not too demanding a specification to achieve then 😉
Here is that fabled sketch – or badly photo-shopped image as it happens.

It is mostly a pretty simple idea, put a column on the 50mm base and mount an appropriate looking model on the top to represent a statue. In this case the statue is not representing a specific guild, but the column could hint at a Masons themed goal. Base it to match my team/pitch and jobs done.
The Basic Parts List
Here is a list of the basic parts that make up the above concept sketch.
- Cake decoration – 3in tall tiered cake support column, link to example.
- Tale Of War Dilios miniature, link – but I got mine second hand.
- Guild Ball ball from any of the starter sets, link to EG GB store page.
The Column
The square base of the column was much larger than I expected, over lapping the edge if the 50mm base’s recess. So I decided to cut the square bottom of the column off. I also thought that the top could be cut off too, reducing the overall height and making the column’s appearance look more balanced top to bottom.

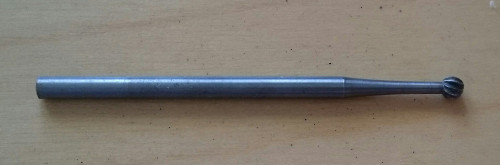
I also removed the mould lines from the column. For the most part this was simple, but the lines that ran down the length of the fluted section of the column were in the bottom of the flute. These were hard to remove while trying to maintain the look of the fluting with a knife, but I found a rotary tool’s ball shaped cutting bit really useful (no idea what it is actually called sorry).
The Bases
Both the 50mm base that the column sits on and the 30mm base that the statue model sits on had resin base toppers inserted. They match the rest of the team and are just casts of some plasticard base toppers I made a while ago.
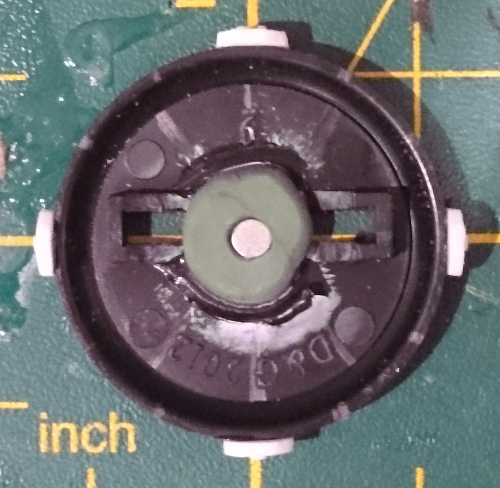
The statue’s base sits on an upside down 30mm base. Just to make it look like an ornate plinth on top of a column. I intended to magnetise the 30 mm bases so that the statue mini could be taken off and stored like any other model for easy transport. However at this point I had an idea for tracking the score – more on that later, but for now I needed to ensure that the back to back magnetised bases would rotate and remain centralised with each other.
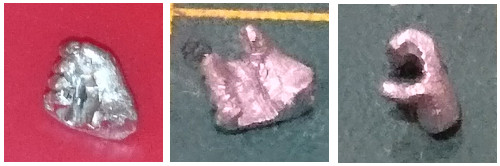
I removed the centre of the plastic slot from the underside of the base. I then put a blob of green stuff in the middle of the base and placed a magnet in the centre. I pushed the base down onto a clear piece of plastic so I could check that the magnet was still centralised while getting the magnet and greenstuff flush with the bottom of the base.

The above pic is taken looking through the plastic. Before putting the green stuff in place I had put some pencil lines on the base to help make sure the magnet was in the middle. I also used two different diameter magnets on each half. This was to help with any misalignment problems if the magnets weren’t quite central enough. Of course you have to make sure you have the magnets polarity correct!
The Statue
The ToW miniature was cleaned up and prepared for assembly. The casting wasn’t particularly great, there was a lot of flash and pretty big mould lines. It was no where near as good as some manufacturers including Steamforged. As I was doing this I decided to GuildBall-ify the shield some what.
The Shield
I removed the lambda symbol from the Spartan’s shield used a piece of greenstuff to make a smooth flat circle on the surface of the shield. I then sculpted the GB logo on to the greenstuff. I started with the ball’s stitching trying to keep it even around the edges. Then I sculpted the GB lettering, constantly referring back to the logo while doing it.

After I got it finished I had realised that the stitching had a gone a little awry under the letter B, and so smoothed out the lower edge and redid the ball’s stitching. After I finished that, I was very happy with the finished shield’s GB symbol.

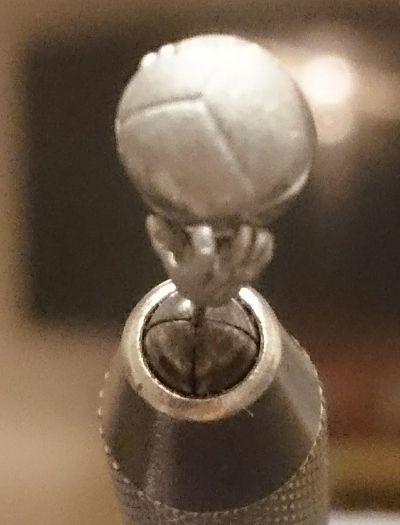
Grasping the Ball
This is probably the most involved process of the whole build. The hand was originally holding a spear, pointing it out horizontally in front of the model. I wanted the hand to hold a GB ball. To do this I removed the spear either side of the hand but as close to the hand as I could. Then using a pin vice I drilled out the section of spear shaft in the hand’s grip.

I carefully trimmed any remaining spear shaft away from the fingers. Then I very carefully separated the thumb from the fore finger, with a sharp knife. Doing that opens up a gap between the fingers and thumb which I gentled opened further with blunt sculpting tool.
At this point I was struggling to hold the small part and so I inserted a small pin into the wrist so I could hold it in a pin vice, and eventually attach it to the statue’s arm. I then separated each finger, but this time I used a jewellery saw as a much finer cutting blade was needed.

This allowed me to splay out the fingers and attempt to make them grasp the ball.

I spent some time carefully manipulating the fingers and thumb to get them to hold the ball as close to how I intended as possible.
Statue Completed
I then pinned the head, shield and hand to the main body, and pinned the model to the 30mm base. I then used a little greenstuff to smooth over some of the joints, and I also used a little on the hand to give the hand a little texture and try to fix the little finger I accidentally damaged. Finally I glued the ball in place.

At this point I could have glued it all together and be done.

However, as I mentioned earlier, I realised that by using the magnets I could use the statue as a VP tracker. By rotating the statue on the magnet like it was a hand on a clock, and like a clock put numbers around the edge of the 30mm base to represent the score.
The VP Tracker
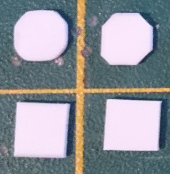
To make the victory point numbers I cheated and bought some plastic scale numbers by Slater’s Plastikard (link to the product on eBay). I mounted the numbers on plasticard plaques. Each plaque started as a 5mm x 5mm square that I cut the corners off and then rounded off with a file. Although I had 12 to make, I didn’t really make any attempt to make them all exactly the same size. As you can see in the picture below, the squares don’t even start exactly the same size (bottom row), so by the time the corners a cut (top right) and then rounded off (top left) they are all going to be different. I did try a hole punch to get uniform circles but the plastic ended up warped.
Quick shot of the alpha-numeric characters by Slater’s along side a ruler so you can see how small they are.

I did take a couple of pictures of the finished number plaques, but the photos didn’t come out well at all.
The next task was to mount the plaques around the edge of the base. Rather than just guess I used the guides on my cutting mat. Lining up the 12, 3, 6, and 9 with the grid on the cutting mat, while the magnet was on top of the intersection of the grid and the 60 degree line. That 60 degree line was then the correct position to place the 1, 4, 7, and 10 when you kept rotating the base through 90 degrees.
As I only had the one 60 degree line on my mat I had to then guess the remaining positions by eye, but it wasn’t hard.
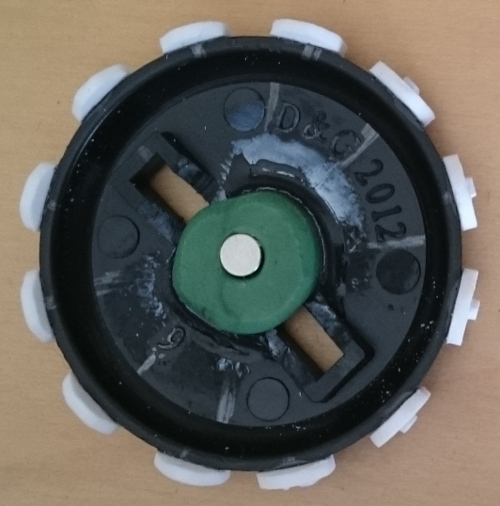
The finished base with all the number plaques attached.
Finishing Touches
As the goal is fairly tall I suppose it would be easy to accidentally knock it over, especially as the mini on top is metal but the rest is plastic, so making the goal a little top heavy. So I decided to add some ballast to the bottom of the base to aid in counter balancing the mini in case it gets knocked. To do this I simply filled the bottom of the goal’s base with poly-filler, and once dry gave it a quick sand to make sure the bottom was flat. As I had done this before gluing everything together I also added some to the bottom of the column.

I am looking at adding some vegetation and/or small scenic items for the base, but as I haven’t decided what exactly, if any yet. So they will be left out of this post for now.
Completed Goal
Here is the completed goal, ready for painting.

Part Summary
Here is a list of everything used to make the goal.
- 50mm base, and a couple of 30mm bases.
- Resin base toppers to match my teams.
- Tiered cake support/decoration. Bought off eBay – so maybe not the cheapest, shop around.
- Guild Ball ball – from one of the many starter sets I’ve bought.
- Tale Of War Dilios miniature, mine was second hand and appears to have the wrong head.
- Slater’s plastic numbers – again bought off eBay so shop around.
- Plasticard, ~1mm thick.
- Magnets, 2mm and 3mm diameter.
- Greenstuff, super glue, and polyfiller.
Congratulations if you have made it this far through the article 🙂 as a reward here is the third reason for using the magnets, and a reminder for the first two.
- Easy storage and transportation of the goal.
- Allows the goal to be used as a VP tracker.
- You can change the statue to suit the team you are using.
So the last item on the parts list is:
- Anvil Industries sneaky alternate statue for when the Blacksmiths drop! (link to the Anvil Ind. Blacksmith)

I have to say this model was a joy to work with, barely a mould line, really nice cast, no bubbles or gaps needing filling. If this is a typical example of their products I really wished I played games that I could use their models for.
I didn’t think the Blacksmith model required any conversion work, the model is fine as it is. Here are the two statues side by side. The model’s are of a similar size, both are on 30mm bases. The Spartan on a round lipped base, and the Blacksmith on a bevelled base.

And the completed Blacksmith’s goal.


Pingback: Guild Ball Goal – Painting the post | Splayed Paint Brush