Repainting the Firespray-31
X-Wing is a fantastic game, easy to learn, hard to master, and part of its appeal is fully painted models. They are not bad either, I am more than happy with fielding them straight out of the box, and they look great on the table top.
But…
This is me we are talking about here, and I like to tinker. So this is my first attempt at repainting a stock model, and I am going to repaint one of my favourite models in the game, the Firespray-31.
I just want a different looking Firespray-31, really that is all there is to it. I am very tempted to paint it to look like Kath Scarlet’s ship, but I really want to try some new techniques for me, and I am not sure I’ll be able to pull such a complex paint scheme off.
- I want to try some different sorts of weathering than I have used before.
- I want to use my airbrush as much as I can.
- I also want to try some OSL (Object Source Lighting) effects.
Here is the inspiration for my first X-Wing repaint; Fantasy Flight Games’ artwork for Kath Scarlet’s Firespray.

Stages 1, 2, & 3
I got carried away and forgot to take progress photos but to be perfectly honest, sometimes they say less is more 😉 So what did I do?
Well the front of the model got an undercoat of brown spray (from the Army Painter range). I left the rear alone for the moment as I was just experimenting. I picked brown because I plan on it becoming visible when I do the weathering and it seems a good colour choice for a battered space craft.
The model then got some random ‘pre-weathering’ (I have no idea if these are actual painting terms, I am just making them up as I go). I got some of the foam that comes in blister packs with models and tore it up so I had a couple of small sections with a fairly random rough surface. I used these as add ‘paint sponges’ to stipple random small splodges of colour to the brown undercoat. To do this I gave the torn end of the foam a good dunking in some paint and dabbed most of it off on a paper towel, similar to how you would go about dry brushing I suppose, then the remaining paint was dabbed all over the brown undercoat. I picked two colours for this:
- P3 Cold Steel, to emulate new chips in the paint work exposing fresh metal.
- P3 Khador Red Highlight, which is a pretty bright rusty orange if you ask me, to represent some rust corrosion.
Finally after that I gave the whole front of the ship a black wash. This was to tone down the fairly bright colours I had just used and more importantly to add some shading to the panel lines of the ship.
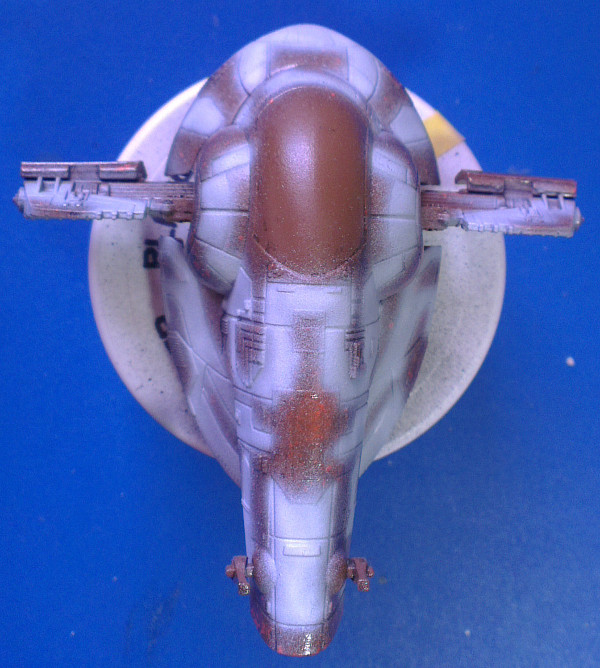
This is what I ended up with…

You can see to the right of the ship the two chunks of foam I tore up for my ‘pre-weathering’ one coloured orange and the other silver.
Stages 5 & 6
These are boring steps for progress pictures, so I wont bother with them. The whole front of the ship got a coat of gloss varnish. When that had dried thoroughly, I gave it a couple of coats of AK Interactive’s Worn Effects chipping fluid (this is instead of the wife’s hairspray, if you are familiar with that technique). In terms of what this looks like, look at the above image and imagine a glossy shine to the model, that’s why I haven’t bothered taking a photo 😉
Stage 7
Time for things to get trickier, although the varnish and chipping were airbrushed on there was no delicacy or care required in where it went. Now its time to start colouring in the model. I choose to do the white areas first, sort of following the pattern in the artwork at the top of this post. I did not use a pure white, I picked a greyish white to airbrush on for two reasons:
- I suspected the off white would actually cover better than pure white for some reason.
- So I could use pure white for highlighting.
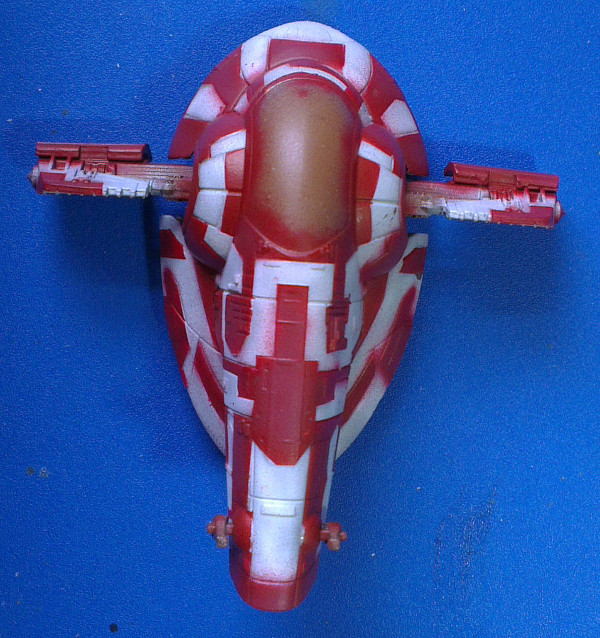
So this is the model after an airbrush of VMA Pale Grey.

I then went back with VMA White to give the panels some highlighting.
Note that the white circle behind the model is an old spray can top that I had mounted the model onto with some blue tack. So I could hold the model without touching the paintwork.
Stage 8
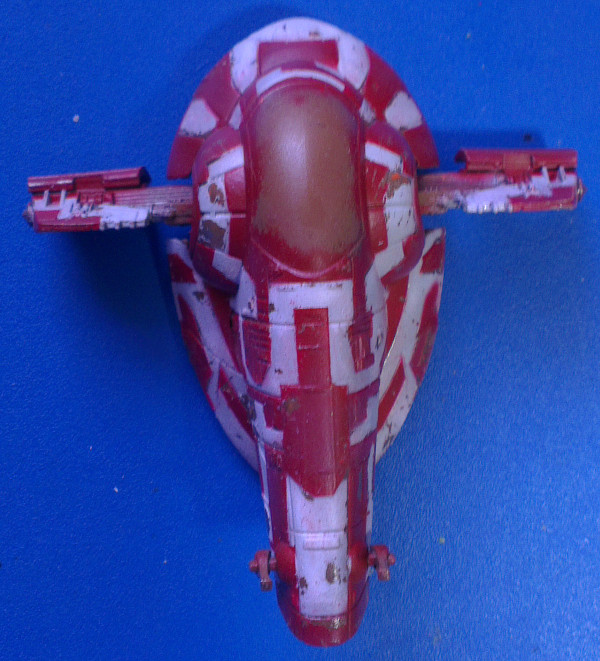
Onto the red colour, which was VMA Fire Red. I knew I didn’t have the ability to do a nice neat job with the red without masking, but I tried any way as I was trying to rush. However this was a bad idea, and I soon tried to mask the model as best as I could with a mixture of masking tape and just a piece of paper. Hence the red was a slow job and looks messy in some areas.
Like with the grey/white, I tried to add some highlights to the panels by mixing a lighter shade of red. ended up a bit pink for my liking, so I may go back with some red ink at some point and give the red areas a glaze to bring back the red colour.
Stage 9
So in the image above you can see that in some areas the panel edges are very fuzzy, where I either didn’t use a mask at all, or just did a very bad job of masking. So I went back with some of the original grey colour and a paint brush (yes I cheated and got a traditional brush out) and tidied up the borders of the grey panels.

Looks quite good like that now, but onto the next step…
Stage 10
Now it was time to weather the model. I used an old completely knackered stubby splayed paint brush and dipped it in some clean water. Then I just rubbed the areas where I wanted the paint weathered. Gently at first but gradually applying pressure with the brush until the paint started to rub off.
Stage 11
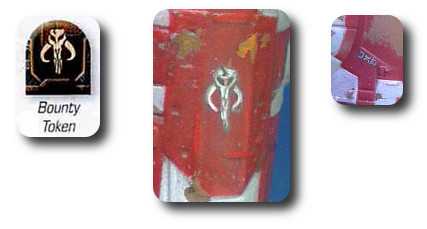
Before I sealed the model to prevent any more paint rubbing off I thought I might do a little freehand and then see about weathering it too. So I painted some runes just under the canopy. After a little Googling I found this in a Wikipedia article. Not the easiest of runes to paint small lol.
I also decided to add a freehand symbol, the model comes with a token that is used when playing X-Wing mission 5: Preystalker. After getting them painted on though I decided that weathering them would be a little much. Here is what I ended up with.
Stage 12
I went round the model with a nearly white grey mix to touch up the panels again, I also did the same with the red panels using P3 Khador Red Base. The model was now sealed with some matt varnish. This stops any further paint rubbing off the model as I handle and continue working on it.

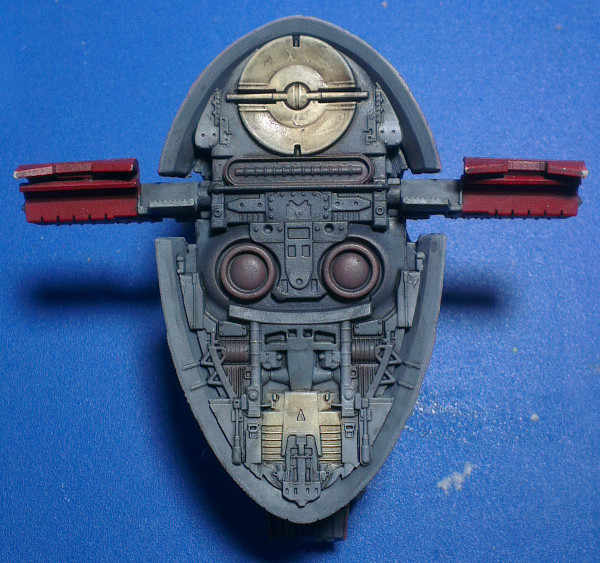
I then gave all the paintwork a black wash, and then all the weathering/chips were highlighted with pure white, for the grey panels, and a mix of red and light brown for the red panels (in hindsight perhaps should have found a brighter red highlighting colour). The highlight was placed on the lower edges of the chipped areas. Conversely the top edges of the chipped areas were shaded with a really dark brown (dark brown mixed with black). This was to represent the shadow underneath the chipped paint and the light catching the edge of the chipped paint below the ‘scratch’. Both the highlight and the shade lines were kept as thin as possible, and I tried to be consistent in their placement all over the model i.e. as if the light source was overhead. In the image below I have also painted the outrigger support struts, the cannons, and undercoated the entire rear of the model with P3 Iron Hull Grey. As well as painting the canopy black again.
Stage 13
Moving onto the rear of the model now, I mentioned I had undercoated the rear Iron Hull Grey, well back using an airbrush i went round with a various shades of grey (not 50 though) adding highlights to the various surfaces. I also used an ivory colour to
add some colour to the ships rear and a dark rusty brown colour on the engine’s cowling and some of the details below them. I also made a much better job of masking off the model!

Colours used, all VMA paints:
- Dark Grey Blue – 71054
- Gray Primer – 71097
- Barley Grey – 71051
- Light Grey – 71050
- Pale Blue Grey – 71046
- Rust – 71080
- Sand (Ivory) – 71075
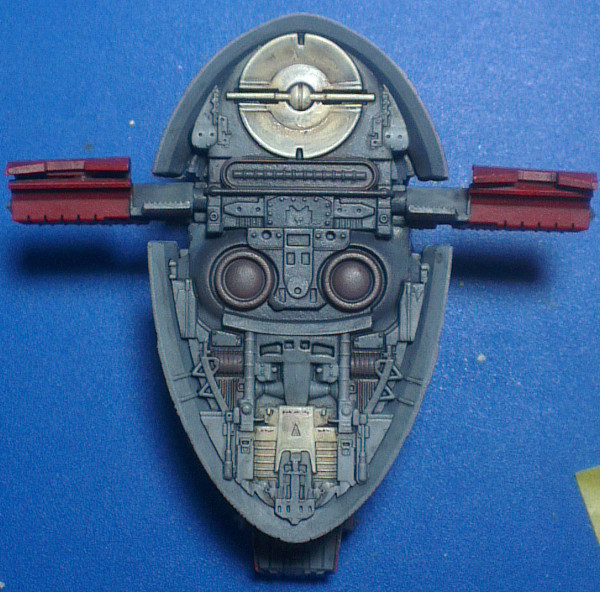
After removing all the masking tape and paper all the grey areas were hit with a black wash. This includes the cannons and the outrigger supports and connection to the hull. The Ivory sections also got a Strong Tone wash too.
I then went round with a brush and highlighted all the top edges of the grey structures with pure light grey. The ivory parts were highlighted with pure ivory and then with a touch of white mixed in too. I also added some red ‘text’ to the lower part of the model, similar to what was on the original.
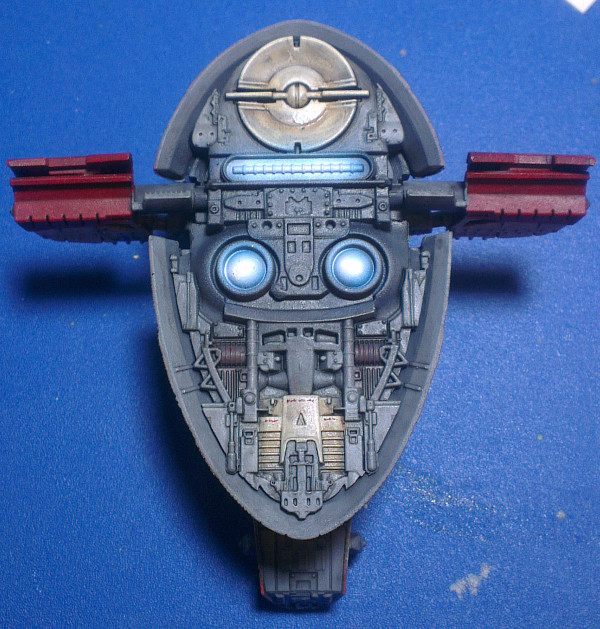
Finally the engines got the airbrush treatment. This is nice and simple to do, and in my opinion gives a really nice result (i just need to find different colours to make it work with now). Basically just airbrush a dark blue, then a light blue and then a white concentrating the brightest colour to where the brightest part of the engine glow would be. Colours used, all VMA paints:
- Blue – 71004
- Light Sea Blue – 71089
- White – 71001
Stage 14
Finishing touches were added, after a matt varnish was applied to the model I went back and applied some red ink to the black canopy and then gloss varnished it. Although to be honest the red ink is not that noticeable because of the gloss finish.
I then added navigation lights to the outriggers. These were done in a bit of a rush and haven’t turned out as good as I hoped but they’re OK. I blocked out the area I wanted the light to be in with a very dark base colour i.e. dark green and dark red/brown. Then using white in my airbrush I went back and coloured the area in with white, allowing a little over spray around the edges to eventually give me the glow effect. The white nav lights were then painted a bright green/red as appropriate and then highlighted with a brighter greeny-yellow/redy-orange. The white over spray was gently tinted with the brighter highlight colours and once dry was given a coat of yellow ink, the red light was also given a coat of red ink. To finish off the lights they were given a gloss varnish like the canopy. Here are the paints used for the lights:
- P3 Iosan Green
- P3 Necrotite Green
- P3 Khador Red Base
- P3 Khador Red Highlight
- P3 Yellow Ink
- P3 Red Ink
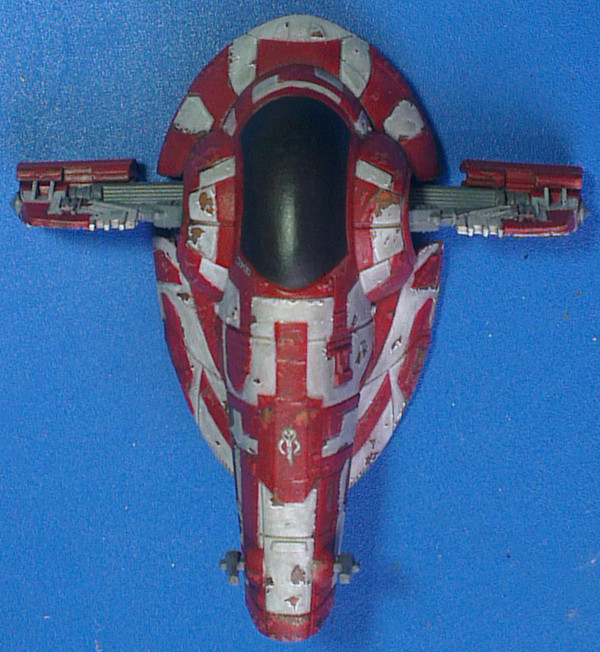
Finished Kath Scarlet Firespray-31 Repaint


I am really pleased with how it has turned out, the weathering is great on the grey areas, not as good on the red. I think a better highlight colour for the red chipped paint was needed. My airbrushing skills need to improve, but there again that is not a surprise as I haven’t been using it for long and was the whole point of using it on this model in the first place. The nav lights are not that good, they are a bit grainy in real life the picture has smoothed them out a little, also a little bit of tweaking may be needed on where the lights are glowing on the model. All that said I really enjoyed painting the model and I’ll look forward to painting other X-Wing minis.

Man, I totally want to get into this game now.
I know I probably say too many positive things on your blog as it is, but it’s really neat seeing you try new stuff.
Do you consider yourself a perfectionist? Cause the stuff you’ve shown on here looks rather impeccable to me. How do deal with something that doesn’t quite meet your standards? Do you just let it go and try better on the next one?
X-Wing is a great game, it is simple to learn and play but once you get used to how it works there is a surprising amount of depth to it. It is pretty popular at the club because of that, well that and pretty much everyone at our club is of that age where a game that is set in the original Star Wars trilogy has an irresistible pull lol.
There is another game to be released soon by FFG that focuses on the capital ships like the Star Destroyers, it’s called Star Wars Armada. So you might want to wait and see what that is like before committing to buying X-Wing if a fleet ship game is more to your liking than the star fighter game.
I don’t consider myself to be a perfectionist (you should see some of my DIY round the house) however I do feel there is always room for improvement. That probably comes across most in what I write up on the blog because I generally see ways to improve when I am writing up what I have done (perhaps I am overly critical of myself). I figure I may as well put those thoughts in what I write in case anyone else has some good ideas to add. That and I know myself when I am painting if I am doing something to the best of my abilities or not. Sometimes I am just rushing to get something done, sometimes I am just struggling with the technique, other times I am just having an off day (if the latter is the case I tend to just stop and go no further until I feel more in the mood). I rarely go back to something and try to improve it, and then it’s usually only if I really do know I’ll do a better job just in case I really mess it up lol.
Like with Butcher1’s armour weathering, I was very very tentative about going back to the finished model and doing what I did just in case I spoiled all the hard work. Same would be the case if I was returning to fix something, sometimes it really is better to just leave it be and do better next time.
Brilliant! I’m loving all the X-Wing repaints I see online. They bring so much originality to the already great models.
Do you have any more X-Wing repaints in the queue?
I agree with you there, I have been inspired by what others have posted online, they are what encouraged me to give it a go.
I have a few more ideas for repaints, taken from the X-Wing series of novels. I want to try and paint some different colour X-Wings like Corran Horn’s Corsec green X-Wing for example.
I also want to do some converting of the YT-1300.
Of course finding the time and getting round to doing all this stuff is the real trick isn’t it 😉