So this is yet another of my old tutorials that are no longer on the web, and hence getting republished on my new blog.
Modernising the Mortar
Mortars have existed for hundreds of years in the real world,don’t believe me go look at wikipedia. The Khadoran mortar resembles the early style of portable mortar (link or link), and while I recognise that the Iron Kingdoms’ history and technological advancement is not meant to mirror that of our own history, I would like my Khador light artillery to have developed a little further than depicted by their models. So with that idea in mind I want to make my Khador Mortar represent an Iron Kingdoms version of a more modern mortar (link).
Parts List
- Classic Destroyer left arm/bombard – PP store link
- Brass rod and tube of various dimensions that slide into one another
- Plasticard sheets (scrap really) and tubing
- Khador Mortar artillery crew with telescope – PP store body and arm links
- Khador Field Gun loader crew – PP store link
- Random nut from a hardware store
- Round valve style handle – Zinge Industries link
Note that the crew listed above is what I used as you’ll see in the completed picture at the end of the article, but use whatever you want.
Tool List
- Razor Saw
- Craft Knife
- Pin vice and drill bits, one about 1.2mm in diameter and one the same size as the brass rod.
- File
- Hobby vice
Converting The Mortar
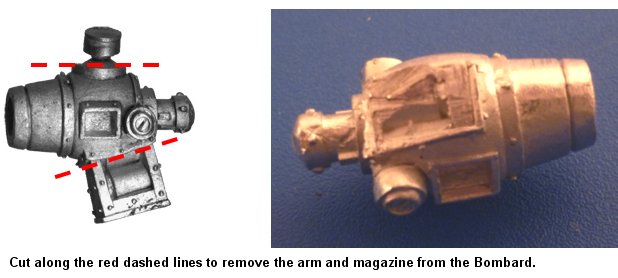
The process is pretty simple if you are comfortable using your cutting tools. First step is to cut up the Destroyer’s bombard, removing the connection to the arm and filing it flat. Then remove the magazine as best as possible, but leave the raised lip with the rivet detail around the recess that the magazine was in.
 Tidying up the recess is the hardest part of this conversion as it is difficult to get a knife into the recess. However if you drill out the majority of the material with the larger drill bit then that makes removing the remaining material easier.

Top tip: You could smooth out the bottom of the recess with some modelling putty if you wanted to, but I didn’t bother thinking that the mortar would be tilted forward hiding the worst of the surface from view anyway.
Using the drill bit that matches the size of the brass rod, drill two holes straight into the recess and glue two lengths of brass rod in to them. These form the mortar’s legs although at the moment they will be sticking straight out from the mortar and parallel with each other but cut them to the same length. Then glue the nut to the rear end of the mortar at a slight angle to tilt the mortar, dry fit this first to align everything up as you want it. Then bend the two brass rod legs, where they enter the mortar body, out to form the bi-pod of the mortar. Finally using the brass tube was cut to appropriate lengths and slid over the brass tube to give the impression of telescoping legs.

The mortar’s feet were simply plastic tubing of an appropriate length trimmed in two lengthways to form an arc. Then a hole drilled in the side of the remaining tube for the leg to go through. You might want to play around with different sizes to find what you like best.

The last few detailed were to add some rivets to the base plate, to at the very least disguise the fact that it is a nut. I cut some scrap plasticard to roughly a small hexagonal shape and used those. However there are plenty of pre-made rivets and nuts available out there nowadays, here and here are a couple of options from Zinge Industries. I also added some brass rod/tube and the valve handle to represent some sort of aiming or bi-pod retraction system.

These mortars were converted back in 2012, and I am ashamed to say they are still not painted, maybe over the next few months I’ll get round to painting them. Otherwise here is the original completed but unpainted picture.

