Warcry has unexpectedly captured my attention since its release in August. It was a game I didn’t think I would enjoy and I certainly didn’t plan on buying into the game. However after a watching and playing a couple of demo games I found I actually really enjoyed it. I have since played in two events and play it most weeks at Rogue Games’ store. From a personal point of view, like most table top games, it is more enjoyable to play with painted models over painted terrain. For the second of the two events I volunteered to paint one of the Warcry terrain sets for Rogue Games – the Corpsewrack Mausoleum, in fact during the first event I played all three of my games this over the bare plastic set (I wonder did this in any way influence my decision lol). This is a brief rundown of how I went about painting the Corpsewrack Mausoleum.
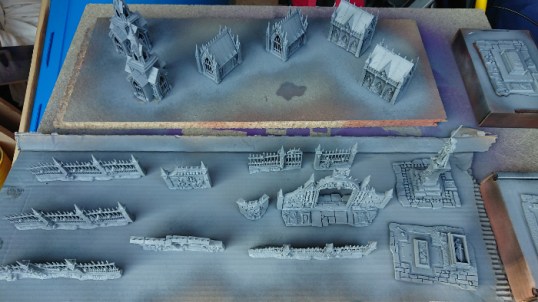
The assembly work had already been completed by Bryan the owner of Rogue Games, so the first step for me was to get the scenery primed. To this end it was all rattle can sprayed black. This was then followed by two coats of grey primer. The first grey coat was at an angle from the sides, the second coat was from above. This was essentially a zenithal undercoat but without using white, ensuring that the upmost surfaces were a solid grey and the deepest shadows remained black. Hopefully having a nice transition between the two, you need to be careful when using rattle cans to do this type of work, as there isn’t that much control with a spray can.
Next job was to mask off all the stonework around the roofs so I could spray those too – just used ordinary masking tape. This actually took a lot of time to do, more than I anticipated, so if I was to paint this set again I am not sure if I would do this in the same manner.

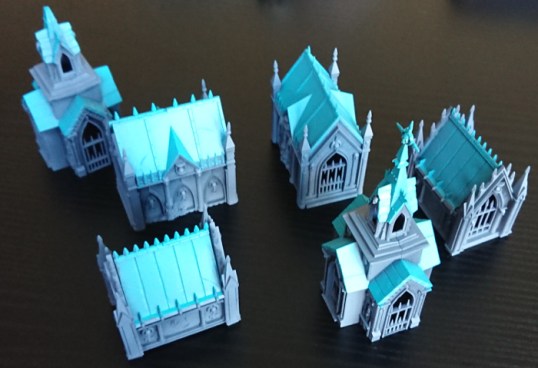
However the roofs were then sprayed with Tamiya TS-41 Coral Blue. I tried to be careful how much paint I sprayed on. I wanted to try and retain some of the shading from the previous black/grey sprays and not end up with a solid blue colour. To this end I tried to concentrate the spray on the centre upper potions of the roofs as best I could.

Removing the mask was really satisfying, and I was pleased with the result even if it took longer than expected.
The next step was to drybrush the scenery with cheap acrylic paint. I bought mine from The Range, the colour was Buff Titanium from the Graduate Acrylic paint range. An attempt was made to always use the brush in the same direction, from top to bottom. However some locations needed a side to side action to get reasonable coverage. I was using a brush more suited to painting your skirting board to get this done in a reasonable length of time.

The walls received the heaviest dry brushing. The blue roofs were lightly dry brushed. I didn’t bother with the railings as they were going to be painted dark silver.

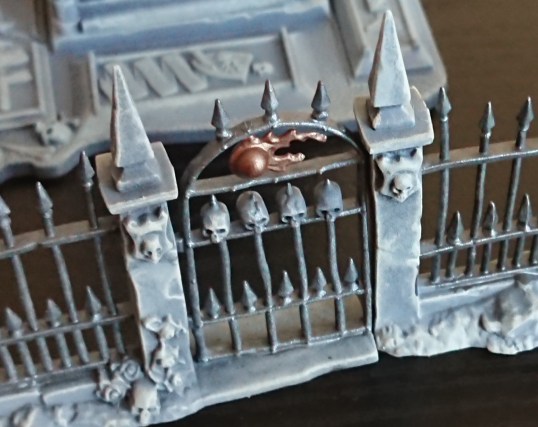
With the stone dry brushed it was time to paint the railings. A little care was taken to avoid getting the metallic paint on the stonework. The railings, gates, and spikes on top of the walls and roofs were paint dark silver – VMA Metallic Black 71073. The statue, the top of the spire, and the cross on top of the stone archway were painted VMA Metallic Rust 71069.

I gave the whole scenery set a wash with a mix of black and sepia brown washes, 2 parts black, 1 part brown. The washes were homemade, after watching a You Tube video by Midwinter Minis on making your own washes. I thought was a great idea for using on terrain and gave it a go myself – here is the Midwinter Minis vid link.
[Midwinter Minis are well worth subscribing to – I find their tutorials really well put together and inspirational; I’m tempted to buy Blackstone Fortress just off the back of their painting vids]

At this point I think the scenery is really coming together nicely. I could have left it here, but there a loads of details begging to be painted.
There are quite a few pieces of vegetation on the scenery, these look like some variety of flowering bush/shrub. I went round and painted all the greenery with an olive green paint; VMA Camouflage Light Green 71006. Then I hit it all with a wash of GW Athonian Camoshade.

For the flowers on the shrubs/bushes I actually tried three different colours of flower. First I tried purple but at a distance it disappeared amongst the green foliage and grey stone. I then tried blue, but that didn’t really pop as much as I had hoped. So I then went pink. You can see here the blue and pink test flowers (I repainted the blue flowers once I decided pink was the way to go). The pink flowers were painted with VGA Pale Flesh 72703, then quickly shaded with P3 Murderous Magenta. It was a fast paint recipe because there are lots and lots of flowers. I kept finding them and finding them, and I still missed a couple too.

During August I painted up the Warcry starter set terrain for one of the gamers at Rogue Games. The number of skulls staggered me. This time round I was ready for the skulls (it was the flowers that caught me out this time lol) and tried to approach them super quick. The base coat was VGC Khaki 72061, I tried to leave the eye sockets and nose holes with the darker black/grey base colour to keep the deep shadow. This was followed by a quick highlight with an off white (not sure what I used now – maybe Scale75 Mojave White). Finally the skulls were given a wash with AP Strong Tone.

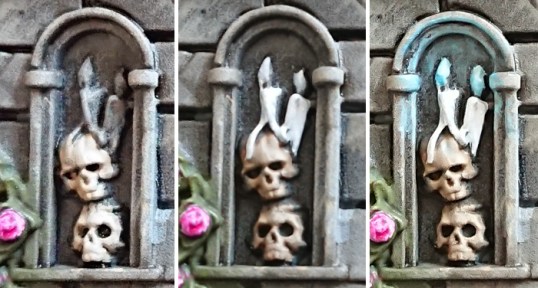
I wanted to add some ‘ethereal blue’ colouring as the base board for the cemetery set has this nice snow covered grey stone, with an ethereal blue glow in places. To try and achieve this I attempted to paint all the candles with a magical blue light. The candles were painted white, and given a subtle shade with a mix of white paint and a touch of AP Soft Tone ink wash. The flames were also painted white, try to maintain a dark line between the candle and the bottom of the flame (like the right hand candle of the two candles in the series of pictures below). The flame was then given two or three thin glazes of VGC Electric Blue 72023. I was attempting to only colour the bottom middle portion of the flame, and leave the top white. The blue was also glazed on the surrounding stone work where the light would hit it, to add that blue glow look.
The railings and gates were looking a little boring, so I decided to add some rust to them. I mixed some Secret Weapon Orange Rust pigment with a drop of AP Soft Tone ink wash, and dabbed it on to the metal railings and areas of stone where I thought rusty water would run onto the stone work and stain it.

A long time ago I bought some Woodland Scenics snow flock for a project that never got started*. I thought it would come in really useful here to try and match the Ravaged Lands’ board. The first attempt to use it was to coat an area I wanted snow covered in PVA glue and cover the PVA in flock. Once dried however I was disappointed with the result – it had that typical British light dusting of snow look. I wanted proper thick snow, so I mixed the flock and glue into a paste on my palette. I also added a small drop of white paint – I’m honestly not sure if this was a good idea of not. The paste was then applied to the scenery. I found that the consistency of the mix is key here. Too runny and it slides off the model, or runs into the recesses like a wash (maybe the white paint was to fault here). Too thick and the paste retained its shape so well that once dry you could still see the tool marks where I’d worked the snow paste into position. However with just the right consistency you could get the paste to hang off edges, pile up in corners, and settle on top of surfaces leaving a nice smoothing effect, just like real snow.

This was a bit of a messy job though!

Of course turns out it’s hard to photograph too, sigh.
Just need to remember to take some in game photos next! Here is the complete board set up at Rogue Games’ store.

*just one amongst the many!
Thanks for reading, and I hope this has been of use to you. Here are some links to aid you in parting with your hard earned cash on hobby products, and help support this blog at the same time.
Rogue Games – my local game store, they have good deals on price and free postage when you spend over £20. I don’t earn any commission, but I do enjoy playing regularly there (if you do buy from them let them know you came via this site).
Element Games – affiliated link, I earn a small commission on what you buy via the links on this site.
Goblin Gaming – affiliated link, I earn a small commission on what you buy via the links on this site.

Pingback: January's look back at 2019 | Splayed Paint Brush