I had seen this simple conversion on the Warlord Games website and wanted to try it out myself – with my own little twist. It is the standard Bow/Yumi arms adjusted slightly to give a completely different look to the model. I have been undecided in what combination of models I wanted to build the bowmen/musketmen sprues. So to give myself some options for the future I decided to make one of my standard models stand out from the crowd so I could use him as a Sergeant of Archery if required.
There are no work in progress pictures for this model, just a brief description of the process and a series of pictures of the finished conversion.
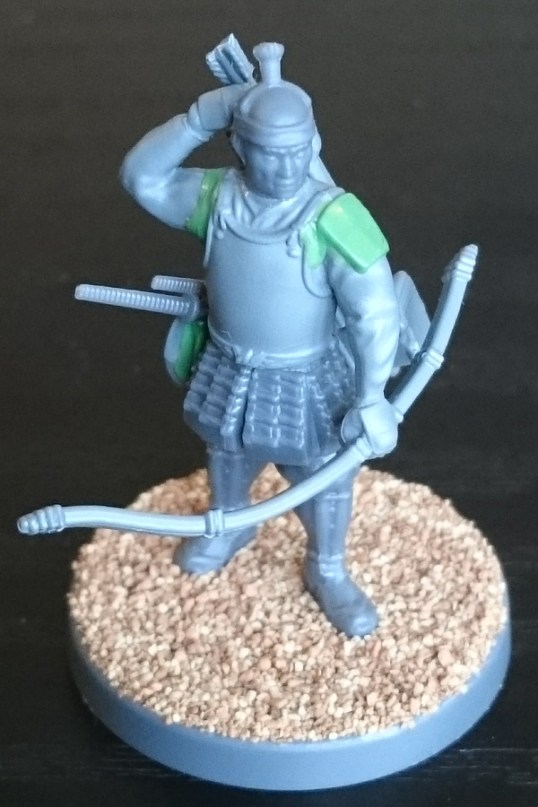
The left arm holding the bow was adjusted at the shoulder joint. Some plastic was shaved off the arm at location of the arm pit to allow the arm to be placed in a lowered position. Greenstuff was used to fill the remaining gap, at this location I added some shoulder armour because I hadn’t taken any material off the top of the arm. This made it difficult to get a nice smooth flow to the sculpting representing the clothed shoulder. The shoulder armour hides this quite well.

I carefully cut the arrow from the right arm and saved it for later, as the twist I wanted to add was to have the arrow actually being drawn from the quiver. To help with getting the angle required to achieve this I cut the hand off the arm at the wrist. I glued it back on having rotated it clockwise slightly (looking down the length of the forearm). I also tilted the hand back ever so slightly as the bond was forming at the joint. This is possible because I am using polystyrene cement, and this glue works by melting both surfaces to weld the joint together. The arm was glued onto the shoulder, and the same trick used to adjust the angle and distance of the hand of the shoulder. The aim of this process was to get the hand up and over the shoulder into a position to hold an arrow protruding from the quiver.

The quiver had a hole drilled into it as close to, what would become, the upper forward edge as possible. I then cut off the arrow head and put the arrows shaft into the hole. I then experimented with how long the protruding arrow should be after dry fitting the quiver onto the back a couple of times. Once I was happy with the length I glued the arrow in position, and attached the quiver. Greenstuff was used to repair some damage to the fingers of the right hand where I had cut away the arrow. I also smoothed some greenstuff over the arm joint at the right shoulder.

Finally, I wanted to have the Ashigaru carrying his Jingasa (‘war hat’ – helmet). I cut the helmet off one of the many spare Ashigaru heads on the sprue, and tried to find somewhere to attach it. This is where it ended up, on the right hip.
Here it hides the side of the paired swords (daisho) from view that is usually attached to the waist, because they are mounted on the other side. Although I did try to place it on his left hip to help fill the gap between his back and the quiver but I should have thought of this location before gluing everything together. I tried to add some greenstuff to represent the hood material hanging down from inside the helmet. Admittedly this last detail looks a bit lame. There are a couple of other things which I am not 100% happy with too. However over all I am very pleased with how the conversion has turned out.
I have just ordered the cavalry set for some reason (failed test of willpower) – prove to me I am not the only one with a lack of willpower and go buy some Test of Honour products yourself.

This is very cool, I will have to do this for my archery sergeant too, i was looking for a way to make him stand out.