Don’t paint while you are tired!
I managed to get some more work done on Butcher1 over the last couple of nights, so here is another painting update. My last couple of painting sessions have been last thing at night for a couple of hours tops. I try to squeeze as much painting into that time as I can and also paint longer than I should when I am tired. This has led to me making what I feel are mistakes or just generally resulting in sub-par painting for what I want to achieve.
So I think my top tip to anyone is when you start to get tired stop painting, you may end up making mistakes that you’ll have to repair at a later date anyway. That said I still haven’t learnt my own lesson 😉
Fixing The Face
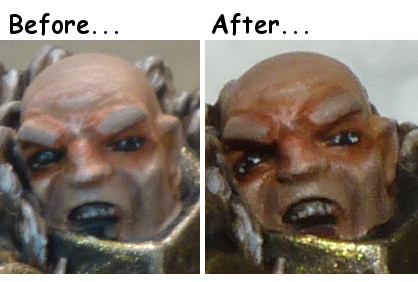
I got some feedback from a post I put up on the PP forums about Butcher1’s face. The post suggested that the eyes needed reworking, which I agreed with. I had painted the eyes late at night when I was struggling to keep my own eyes working properly. So it’s hardly unexpected that I didn’t do the job to the best of my abilities initially. So I went back and repainted the whites of the eyes, and redid the pupil. Now I would like to have tried to have a coloured pupil and put a tiny dot of white on the pupil to show a reflection of light. But I didn’t feel confident enough to try and pull that off so I just used the standard technique I have been using to paint eyes for years. I could do my own graphics to demonstrate it, but there are tutorials all over the web showing this so here is a link to one (the section entitled “Easy version” 😉 ).
So with the eyes reworked here is a before and after comparison. I think the rework is a vast improvement.
That was Monday night’s job, now onto Tuesday’s work…
I tried to make headway on completing the model, my aim is to get it completed for Thursday night’s gaming at the club. That way ending some league points for having finished the model.
Axe Head
As you may remember if you’ve been following these updates I have been undecided about what colour to paint the axe head. I made a decision… red. So using my red recipe, or at least what I thought was my red recipe (unless otherwise noted all colours at Formula P3):
- Base coated Foundry 102A
- Next coat Foundry102A mixed with Skorne Red
- Skorne Red
- Shaded with Sanguine Base mixed with Exile Blue
- Highlighted Skorne Red mixed with Khador Red
- Highlighted Khador Red
- Final highlight Khador Red mixed with Menoth White Highlight
- A coat of Red Ink to reduce the pinkness of the final highlight and tie the colours back together.
Unfortunately I do not like the end result, from the start I wanted my whole force to have a subdued natural tone to the paint scheme. I have ended up with quite a vibrant red, compared to the rest of Butcher1’s armour. So where did I go wrong? Well I was impatient and gave the red multiple coats of red ink without waiting for the ink to dry. Effectively washing the axe in red ink. I should have waited to see how the first coat dried before continuing, as inks have really quite intense pigmentation, henc ei have made my red armour really bright. Once I realised what I had done and went back and gave it a wash of Army Painter Strong Tone, a step I had missed out previously and this has toned down the brightness a little, but not enough for my taste…
So I need to go back and fix this at some point.
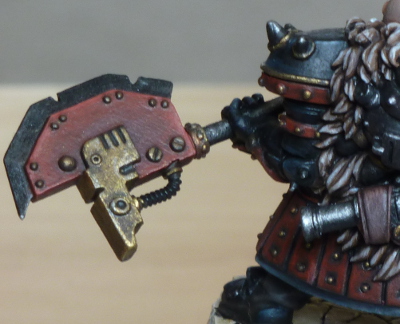
This picture doesn’t look so bad when you compare the red of the axe to that of the armour. My photography skills are not that good.
Leathers
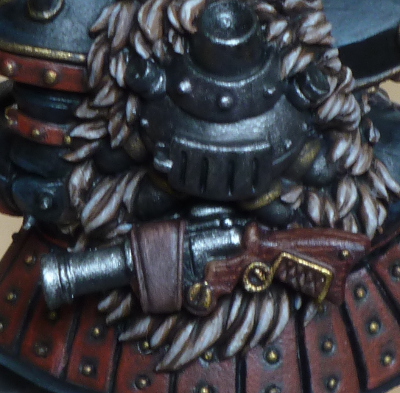
I painted the axe handle, armour straps and belt, the gun holster and the gun’s handle grip all the same way and at the same time. It saves mixing up paint multiple times and allows you to have the same colours across the model. I wanted to have a leather with a slightly red tone to it, here is how I went about it.
- Base coated Umbral Umber
- Highlighted with a mix of Umbral Umber, Skorne Red and Beast Hide
- Second highlight with above mix but more beast hide added
- Shaded with a wash of strong tone
- Further shaded with a mix of strong tone plus exile blue
I have ended up with a leather that isn’t quite as red as I intended but I like the end result so am happy to leave it as is.

Gun’s Stock
For this I also wanted to end up with a reddish looking wooden colour. I definitely wanted to have a wood grain effect in the stock. This is quite simple to achieve with the following method, I am sure it could be done better but I am satisfied with the result.
- Gun Corps Brown base coat.
- Wood grain painted Menoth White Base, thin lines achieved with a small detail brush.
- Shaded with a couple of coats of Brown Ink.
- Further shaded with Brown Ink and Exile Blue mix.
Again I was impatient and did not let the ink dry between coats, in doing that I have very nearly hidden the wood grain effect. Lesson now learnt be careful with inks!
What is left to do?
- Fix the axe head
- Axe blade
- Gun barrel
- Boiler (this has actually been getting the odd wash or highlight as I have gone along)
- Base

Almost there it looks like!
From the picture you have, the axe head looks pretty good I think. It accents well with the rest of the weapon. More subtlety is always welcome though, so I’ll be waiting to see how it turns out.
Good luck this week in the league and thanks again for these updates. Very helpful.
Cheers jimb0, I just put a coat of varnish on the model this afternoon, hope it has dried in time for this evening. I’ll get some pics up of the finished model tomorrow I expect. No work in progress shots though unfortunately.