This article was written back in 2012 and was originally published on another website that seems to had died a death, but I wanted to republish the article to share with everyone.
The Steamroller rules pack has a number of scenarios that require players to fight to control certain points on the table. These points are represented in game by zones, flags, and objective markers. I want to talk about actually representing them on the table, and I’ll show you what I have done for my flags and objectives to use with my Mercenaries.

Zones
Zones are areas of the table top players fight over to try to occupy or deny their opponent, they come in different shapes and sizes depending on the scenario. There are a number of ways to represent these on the table top. Some work better than others and basically break down into two categories:
- Marking out the perimeter/corner points of the zone with various objects. Glass beads for the corners/perimeter of zones. Tile spacers for the corners of zones.
- Flat sheet material cut to size. Paper/card, acetate, rubber, felt/material, plasticard.
To be honest I think the zones are the least interesting to do any modelling with so I’ll skip past them rapidly. However if you have any ideas, or have seen some interesting solutions for marking the zones, share them with us in the comments below.
2014 update: I now use these zone markers from Zinge Industries.
Flags
Now were are getting to the interesting stuff! In SR2012 flags are defined as models with 40mm (medium) bases, with a selection of rules that effectively mean you can ignore them except that models cannot end up on top of them. Last year I used some spare bases with a quick summary of the flag/marker’s rules printed on to a circle of paper that fit in the recess of the base. This year I want to make something that will look good on the table.
So what can we do with those spare 40mm bases? Well if your army is mounted on a specific type of base, just use a few more 40mm bases with out any models attached. If a plain base is a little on the dull side for you then the obvious choice is to grab a spare standard bearer’s flag and stick it to a base. Most factions have some form of standard or flag available to them, some of them could be used by anyone with a little bit of work. Of course you do not have to use a Privateer Press component there are lots of different companies out there that have standard bearers in their model ranges. Or just sculpt your own (I say just as if I can even do that lol).

However just because these points of interest are called ‘flags’ does not mean they have to be represented as flags. Throughout history standards have been a way of identifying units on the battlefield and representing a rallying point for the unit, something of a badge of honor. Other objects can be thought of as rallying points, statues and obelisks being prime examples. An obelisk would be very fitting for Menoth players to use. I have always thought that the Sword Knight leader model would make a cool statue for Cygnar players too.
You could also treat them more like mini objective markers, how about:
- A small arms cache, a few crates stuck to a 40mm base.
- Injured models or a spy/informant awaiting rescue.
- Chest full of coins, or even just ‘X’ marks the spot.
If you are a No Quarter Magazine reader than in NQ40 there was an article on making Circle scenery. In that article a method was shown for producing floating stones. A smaller version of these on 40mm bases would look good, especially for a Baulder tier list. Just use a little imagination or look around for some inspiration. Browsing the forums is a great idea; you can see what other people are doing and take inspiration from their ideas. There has been a thread recently (2014 update: not so recent now and I cannot find the link) in the Privateer Press Painting and Modelling Forum about converting a Leviathan with the addition of soul cages. This sparked off an idea for some Cryx flag markers that would use some large soul cages mounted on a 40mm base.
Finally I don’t think a bit of humour is out of place when it comes to modelling. The flags don’t have to fit in to your lists for purely army background reasons. How about a set of archery butts for a Lylyth2 list? Undead concubines for Goreshade1? Weather vanes and lightning conductor rods for Kruger? How about 40mm bases representing flocks of sheep for the ‘furry’ circle lists, make them a play on the saying ‘a wolf in sheep’s clothing’.

Objectives
In SR2012 the rules about the objectives have become interesting. Your armies can now interact with them significantly and in different ways depending on the scenario. Again they are defined as models, this time on 50mm (large) bases, however they act more like models in that they can be attacked, block line of sight etc etc. Depending on what scenario you are playing they have different effects on the table top.
Privateer Press make some excellent generic objectives, but there is no reason why you can’t tailor them to suit your own army by either using an appropriate colour scheme or the addition of some choice model parts.
There is bags of room on a 50mm base, so a mini diorama is on the cards, now you can really let loose your imagination.
Cryx – a Stitchthrall’s surgery table.
Menoth – a shrine, or a Knight receiving a blessing.
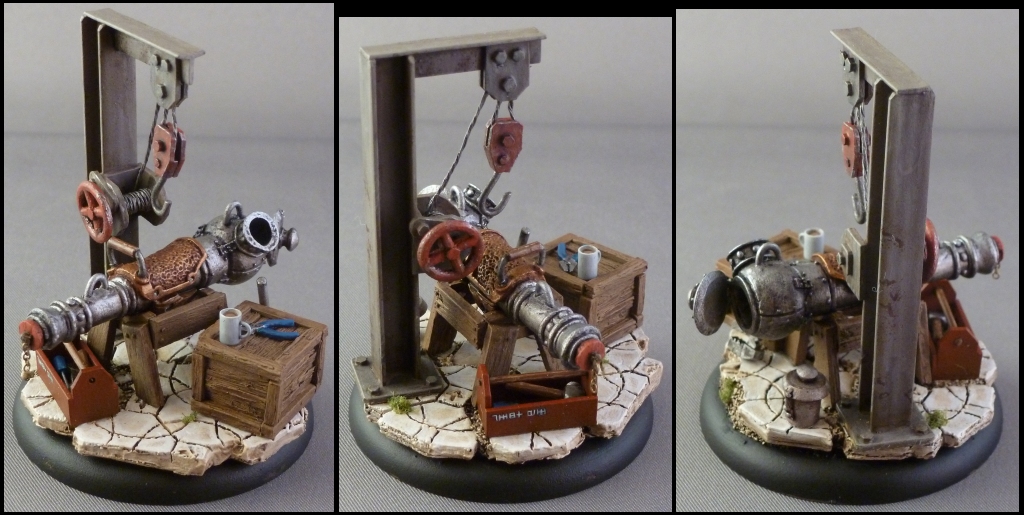
Doc’s Mercenary Objective Marker
I have waffled on about flags and markers in general, now it is time to put my money where my mouth is and talk about building my own objective marker. After receiving a miscast Rocinante gun when I bought the upgrade blister I got a replacement from PP customer service. The miscast gun has been sat in my bits box for a few months now and I have been wondering if I could use it in some way. This was the inspiration for my objective marker, finding a use for a miscast component. All guns and equipment need servicing and maintenance from time to time, so how about a an objective marker representing some equipment under going repair.
The easiest way to allow my objective marker (and flags for that matter) to fit in with the rest of my army was to use the same resin bases that my models are mounted on. I picked the flattest resin large base to build my objective on.
Crane
The crane was built using some plastic odds and ends I had lying around. I used a H section for the upright and a T section for the horizontal beam, with the base simply a square of plasticard. Once the vertical beam was glued in place I cut some small hexagon shapes from some scrap plasticard to represent bolts holding the plate down.
The hook and lifting apparatus was made from plasticard again. The hook being a section of brass rod bent around a drill bit and cut to size. The pulley for the cable to go round was a thin slither of plastic tube cut to be roughly the same width as the diameter of the brass rod. This was sandwiched between some plasticard to make the complete hook. Similarly the pulley arrangement on the horizontal beam was built in the same way, just a thin section of tube sandwiched between two sections of plasticard.
For the rope/cable I stripped the plastic sheath of a sort section of small gauge wire. I took 3 of the individual strands of wire and twisted them together. The cable was threaded through the pulleys and the remainder wrapped around a section of plastic tubing to create the winch drum. This was then mounted on a bracket made from plasticard. Finishing touches were added to make it look usable. Bolt heads, hexagon shapes cut from scrap plasticard, as well as locking lever for the winch. Although it can barely be seen behind the winch handle, which is part of Zinge Industries modelling bits range.


Doc’s top tip: polystyrene cement is excellent for gluing polystyrene plastic to polystyrene plastic. Nothing else. Use superglue for the hook and cable. Poly cement does not set as fast as super glue but it also wont stick your fingers together either! You can use the slower drying time of the poly cement to just tweak the positions of what you are gluing together, don’t mess with it too much though.
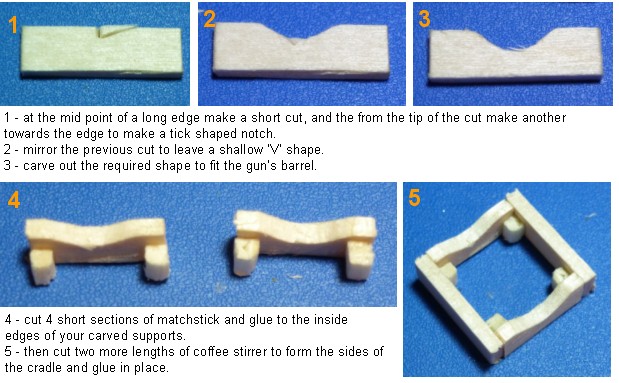
Trestle
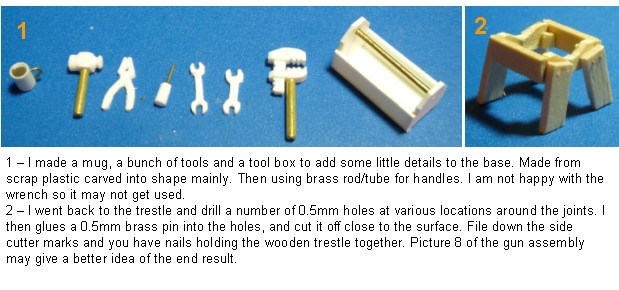
I wanted to build a cradle for the gun to sit on. I wanted it to have a ramshackle, quickly put together look. To build this cradle I used a wooden coffee stirrer. I picked up a couple when I last got a take away coffee. I cut 4 short sections of the coffee stirrer to make the frame of the cradle. Two of the opposite sides had a ‘U’ shaped notch carved into them to support the gun barrel. I then glued them together to make a square. The insides of the corners were supported by short lengths of matchstick. I then used the remains of the coffee stirrer to make some legs. The legs were going to be glued on at an angle, so I cut the bottom of each leg at a slight angle so that they would sit level on the base.

Doc’s top tip: keep the gun/object you intend to mount on the trestle close at hand. Then you can constantly check the size and fit of the pieces you are cutting, helping you get them to fit just right.
Gun
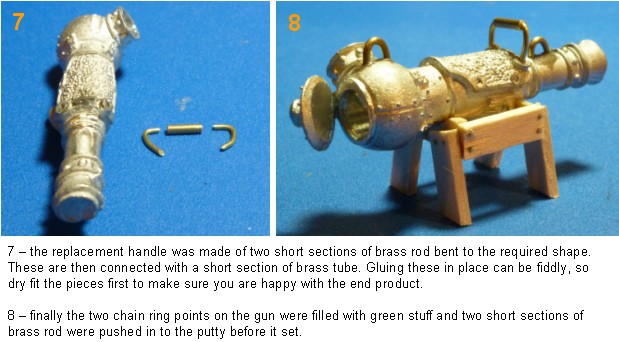
I wanted to take the miscast gun and make it look like it was under repair. The jack’s hand and the muzzle were the miscast sections of the component. The muzzle looks like a bit of battle damage so I decided to leave that, but I clipped off the hand trying to not damage the gun as much as possible, I will replace the handle later. I decided to open the breach of the gun, and also remove the magazine (I assume that is what it is meant to be). I carefully cut these off with a razor saw. At this point I decided to hollow out the rear chamber of the gun, after all I have removed the ‘magazine’ and the gun breach so you would be able to see inside of it. I did this carefully using a cordless drill because the drill bits required are too big for my pin vice. After securing the gun in a modelling vice I drilled a pilot hole in the centre of the gun breach using a 1mm drill bit. I then enlarged this hole with the largest drill bit that fits in my pin vice (2.2mm). Using a 3.5mm drill bit in the cordless drill I slowly enlarged the previous hole. I then finally stepped up the size of the drill bit to match the size of the hole I wanted 6mm. I did this because using the full size drill bit to set off with gave a poor hole finish. I used the cordless drill on the lowest torque setting and went slowly with the drilling, you are not putting shelves up after all. Also you are drilling into metal with a relatively low melting point, and the drilling action generates a lot of heat. I replaced the old handle with one made from two short sections of brass rod bent to shape and a short section of brass tubing. The gun breach door was pinned and glued in place. Finally the holes where the chains attached to Rocinante’s gun were filled with putty and two loops of brass rod pushed into them.

Doc’s top tip: If you choose to take power tools to your models be careful. Only attempt this if you are competent to do so.
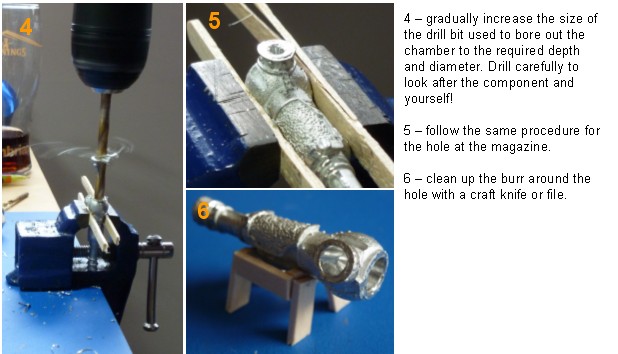
Doc’s top tip: gradually increasing the size of the drill bit rather than just going to full size right away helps a lot. It removes less material in one operation meaning less force is required at the cutting face. You can therefore use a lower torque on the drill, and the cutting will generate less heat. You also end up with a nice surface finish. If you are attempting this you should be taking your time about it any way so what does it matter if you use 3 or 4 different size drill bits rather than one.
Doc’s top tip: pinning the breach door is a good idea as it has a very small contact area and wont take much to knock it off.
Crate
To make a wooden crate I first built a basic box out of plasticard. I had based the size of the box on the number of matchsticks I was planning on using to cover it with. So that made my box 5 matchsticks wide by 5 high. I glued a set of matchsticks round the bottom to form a solid base to work from. The matchsticks used to clad the sides and top of the box were cut in half length ways. This was to give the appearance of a sturdy crate with a solid frame and thinner panelled sides. Also cutting the matchsticks in half gave a courser rough cut wood texture if used with the split surface on the outside of the box. Finally more matchsticks were used around the outside to complete the frame.

Top tip: Careful measuring and cutting of the matchsticks making up the frame is needed to make the crate look good. I have a few gaps on mine which spoil the effect a little.
Final Finishing Touches
A few little details can make a massive difference to a model or base and in this case an objective marker. Objects and items added to add some sort of human element to a model. In the case of my objective marker I thought some tools and a mug of tea would do the trick. They are shapes cut from scrap plasticard or tube, with a little imagination you can really get some good results. So don’t be afraid to experiment.
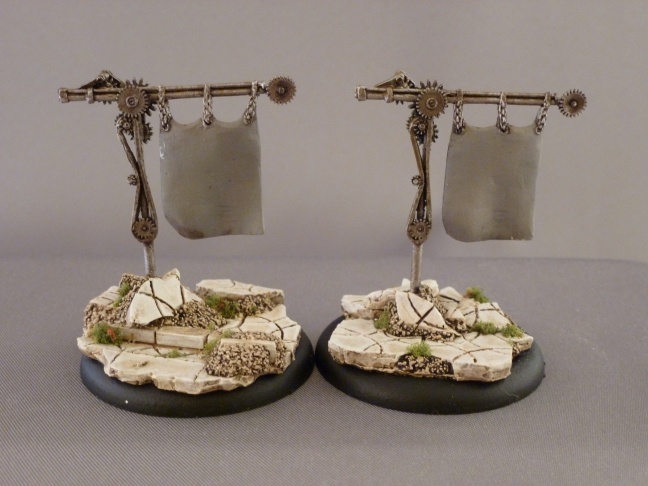
Doc’s Mercenary Flag Markers
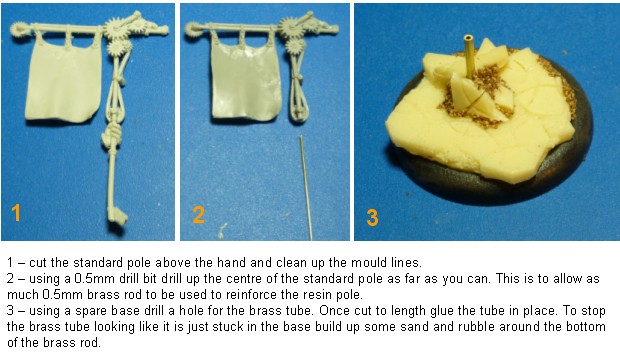
I have made 2 simple flag markers for my Mercenary army so far. A second two are on the cards I just haven’t decided what exactly they will be yet. the first 2 markers used the very steam-punk looking Banelegions standard from the Erec One-Arm model. These are nicely cast resin pieces which are very flexible, for such thin pieces it is definitely better than being brittle. However to help mount them on my armies resin bases I decided to put a thin 0.5mm brass rod pin as far up the standard pole as I could. This will support the resin standard pole while still remaining flexible. The other end of the brass rod was be glued into a brass tube pinned into the base.
The Finished Flags and Objective Marker
Below are my finished markers all I have to do now is get them painted up for the ETC. I was aiming for the Welsh Open but missed that deadline by miles, so don’t hold your breath folks.
2014 update: well 2 years later at least I can add painted images of my objective and flag markers!