
I bought Tater when the Steamforged Guild Ball Store’s Locker Room opened during GenCon. It arrived on Friday (along with a mug or two), so I thought I would get him assembled, as I had some Morticians on the table being put together for a commission (eek – some one is employing my hobby services?! The fool!).
So here is my simple step by step to putting the model together. There is nothing unique here about assembling Tater, so the method used is pretty generic to most models.
Here is Tater, a nice simple two piece model. There wasn’t much in the way of mould lines or flash and only a couple of venting channels to cut off the model.

I decided to go with a simple basing scheme, just a plain old sand textured base that I will add some flock or something too later on. Its actually a long time since I did anything that wasn’t some sort of resin base. So it was something of a novelty for me not to have to remove the model’s tab and put pins in its feet. When ever you just use the tab to stand the model in the slotta-base its rare that it fits perfectly, most of the time being too small and the model is unstable. Here’s a little trick, use your side cutters to slightly twist the model’s tab.

Just enough so that when you place the model’s tab back into the slotta-base it is a neat fit and the model stands up fine by itself.

I also decided to pin the model’s wrist holding the scythe. There probably is no real need, as the scythe attaches at the leg too. But it doesn’t take long. That’s why Tater now has a hole drilled into his wrist…

I used a 0.6mm drill bit, and I am using 0.5mm brass rod as the pin. Why the difference in size? Well it just allows a little bit of leeway in getting it all to line up. Drilling into the wrist was easy as I was drilling into the bottom of the recess to take the hand.
The hand had a raised rounded nub to fit into the wrist recess, these can be difficult to drill into without a little prep work. First I file the top of the nub flat.

And then I pressed the point of my knife into the centre of the flattened top of the nub, sorry the above picture doesn’t really show that too well. The whole point of this was to give me the best chance of starting the drill bit off cutting without it slipping off the nub. Once the drill bit has got started drilling the hole is as simple as the other side of the joint was.

I’ll attach the scythe shortly. First I wanted to get the model’s base covered in sand. Now this is a lazy person’s way of basing a model; gluing the model to the base and gluing the sand on at the same time. First cover the base’s recess in wood glue. Use your fingers to make sure you have glue evenly spread, and also neaten up the edges of the rounded lip of the base to keep the base neat. Then using the glue on your fingers cover the model’s tab in wood glue. Try not to get glue on the model’s feet, but still try and cover all of the tab.
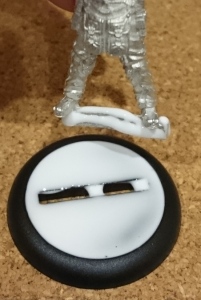
Now half push the model onto the base, just enough so that you can pick up the model and the base wont fall off. This leaves a gap under the model’s feet above the base.

Now cover the base in sand. I put the model’s base in my tub of basing sand and completely cover it. Then gently shake/tap/blow off the excess sand. You can see that the gap between the bottom of the feet and the base has sand in it.
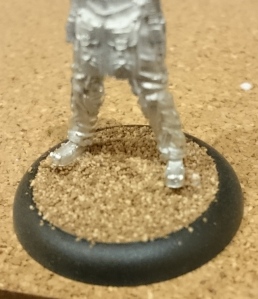
Now gently push the model firmly onto its base, and tidy up any entrant sand. I did the basing this way because there is sand under the model’s feet when you push it on to the base. The model should look like its standing on a solid surface rather than looking like its stood sunken into a soft one.

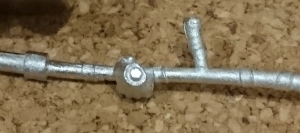
Finally lets attach the scythe. I did this after the basing to make sure I didn’t cover the bottom of the shaft in wood glue and get sand stuck to it. I glued the brass rod into the hand with a small spot of superglue on the rod, and then cut it to size with side cutters.

There is a little rectangular nub near the bottom of the shaft, this fits into a recess on Tater’s left leg, just above the ankle.

Then put a small drop of super glue on the shaft’s nub and the pin/hand. Then fitted the nub into the leg recess and pushed the pin gently into the wrist. Model Completed!
I also covered two extra bases in sand to be my harvest tokens. I have no idea how many you actually place during the course of a game (only 1 per turn, but they can stay in play if not expended right?). Tater has now been primed, but if you’ve visited this blog in the past you’ll know by now not to hold your breath waiting for him to be painted.

